03 Celonis Analyst - 01 Build Knowledge Models and Views
2023-04-07
위 벳지는 수강을 완료하고 받은 뱃지입니다.
01 Build Knowledge Models and Views

01. Navigate the Celonis Studio : REQUIRED
-
Navigate the Celonis Studio
-
Course 30min - Get familiar with the Celonis Studio: Create Spaces, Packages, & Assets.
Hey there! Welcome to basic navigation in Celonis Studio!
When you decide to take this course, we assume you do have some coding experience and the term “development environment” does not scare you away. Also, it will aid your understanding if you have a working knowledge of how data gets into Celonis and what a data model is. If you don’t, consider taking up the “(opens in a new tab)Get Data into the EMS(opens in a new tab)” training track.
A few technical remarks: If you would like to take a break during the training, remember to close the course using the “Exit Course” button in the top right of the window first before closing your browser window. Otherwise, your progress could get lost.
The course will take about 32 minutes and the breakdown for each section can be found beside the lesson title.
01 01 FIRST STEPS IN STUDIO
01 01 01 Access Studio [3:00]
Welcome to the Celonis Studio!
The Studio allows you to combine functional expertise with the power of Celonis Process Mining to build scalable Apps. Celonis Studio is your one-stop development platform to build, test, and edit Apps in a single, low-code environment.

Access Your Training Team
Go to your training team and find the Celonis Studio.
Need help accessing your Training Team? Go through our quick guide here.
You should see Studio at the navigation bar on the left, towards the bottom. You should also be able to see the Apps at the navigation bar, towards the top. No to-dos yet. Just make sure you’re able to access these services, then come back to the course!

The end-user-facing assets you create and publish from Studio will be accessible by business users in the Apps service, given they have the right permissions.
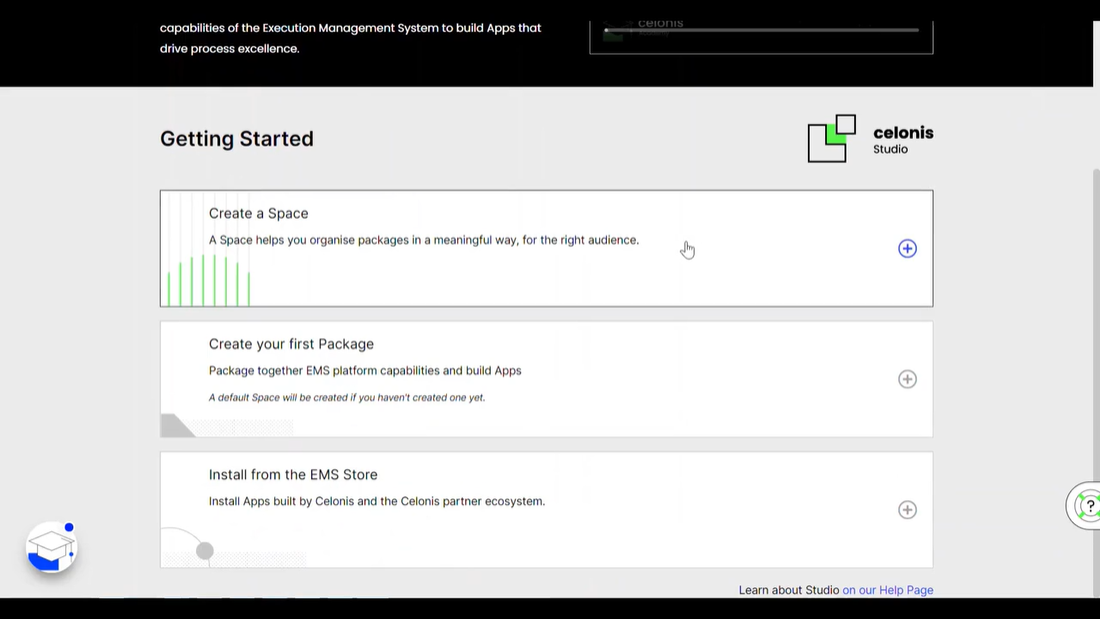
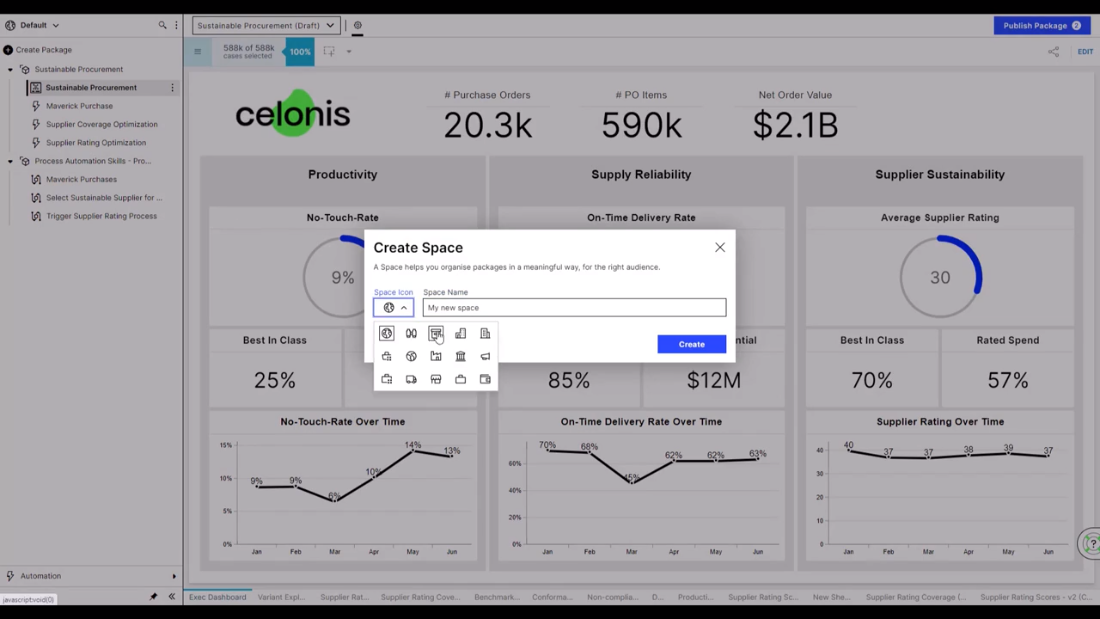
01 01 02 Create a Space [3:00]
As you saw in the video, the very first time you open Studio, you’ll see a screen similar to the picture on the right.
If you have previously created assets in your Training Team’s Studio, then you’ll already see a Space and one or more packages in the package explorer.

What’s a Space?
We assume that you already have a little coding experience so you will know that in every development environment you actually start by creating something often called a project or a workspace. The workspace or Space is a structural element that allows you to organize your work in a meaningful way — and to still find what you’ve been working on a week later…
Similarly, our UX designers did a great job in guiding you towards your very first step in Studio: Creating a Space.
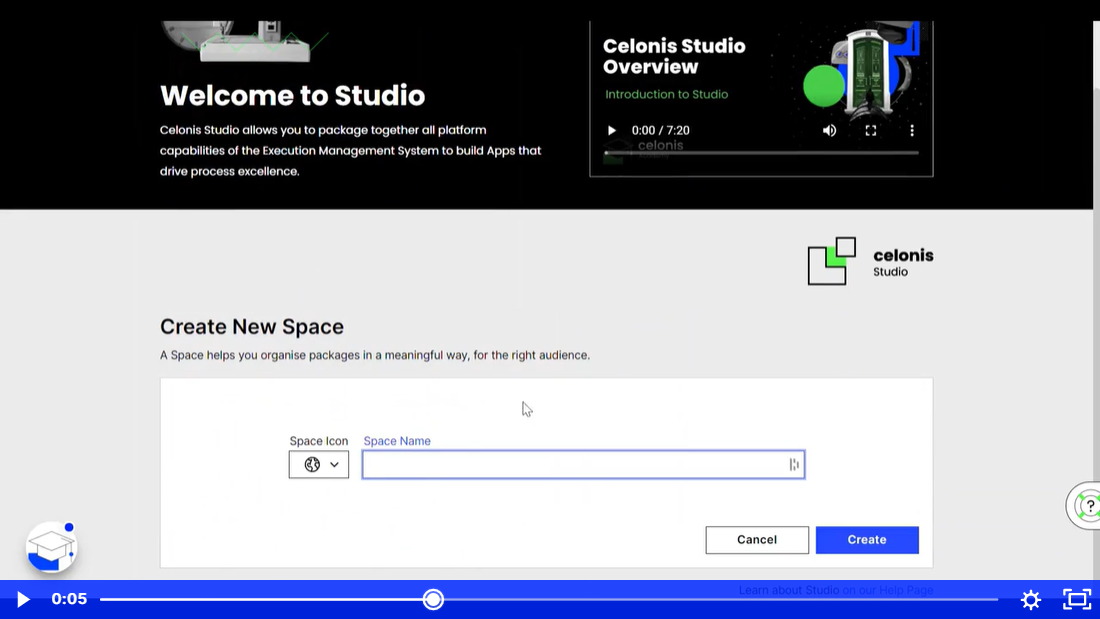
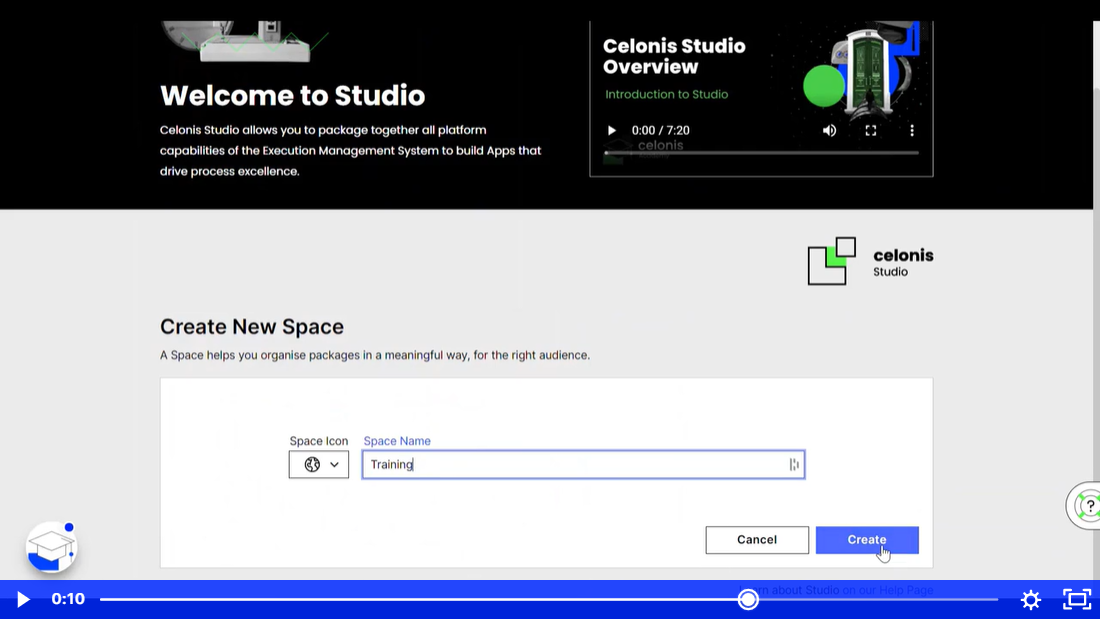
If you already have a Space in Studio and want to create a new or additional one, then follow the steps shown in the video below.
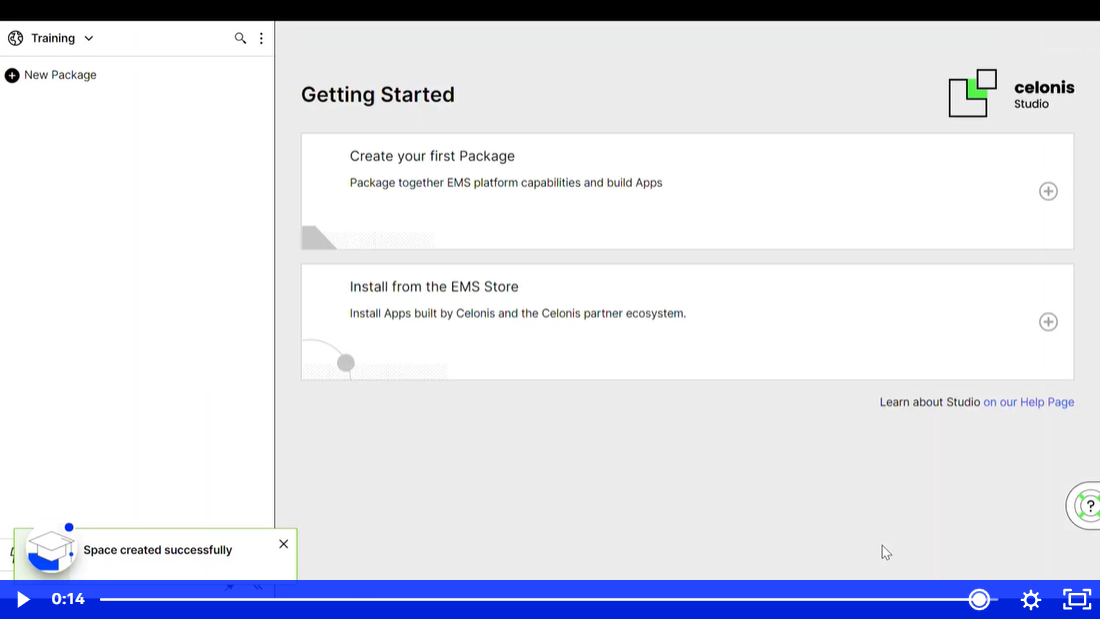
Great! First step done! We’re getting closer to the heart of where we will build our Apps!
Note that you can always see the current space you’re working in in the upper left corner. You can also switch to other spaces using the dropdown carrot.

Your turn!
Go back to Studio and create a space called “Training” just as you’ve just seen it in the video. Make sure to spell it correctly. If you’re unsure what to do, here are two suggestions:
-
Rewatch the video
-
Check out the documentation
But we’re sure you’ll manage :) Come back to the course once you’ve successfully created the space.
01 01 03 Create a Package [4:00]
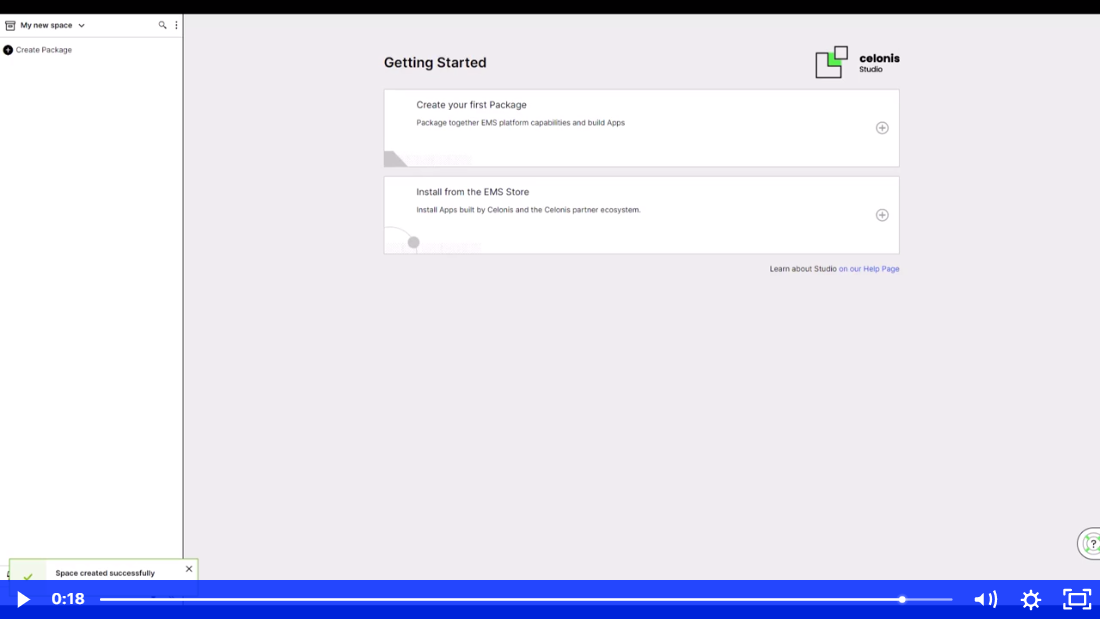
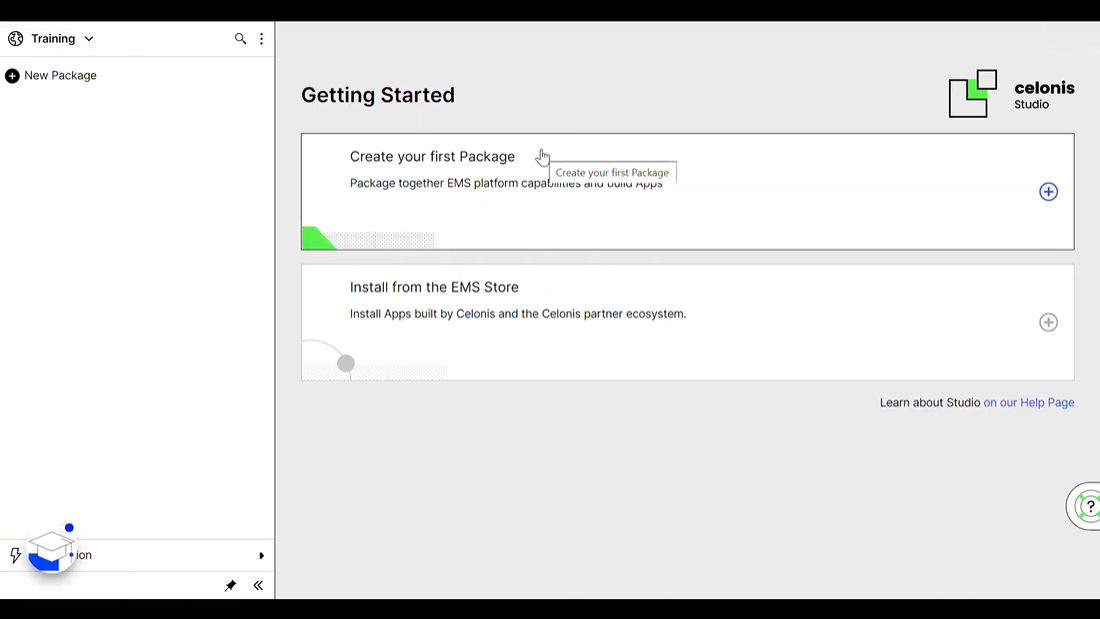
Once you’ve successfully created a Space, Studio suggests two options as the next step: either create a package or install an app from the Marketplace, which is naturally organized in a package(s).
In the Marketplace, you can find apps built by Celonis and the Celonis Ecosystem. But let’s get back to what we’re actually aiming for: Learning about the toolkit to build an app.

What’s a Package?
After we’ve created a Space, we need a Package as another structural element. It is similar to folders and various subfolders on your hard drive and allows you to organize your work in a meaningful way. You can create as many Packages as you see fit. You’ll develop a feel for that over time.
Create a Package
There are actually two ways to do so: either click the button on the left or the big button in the middle.

Watch the video below to see how to create a package called “My first package.”
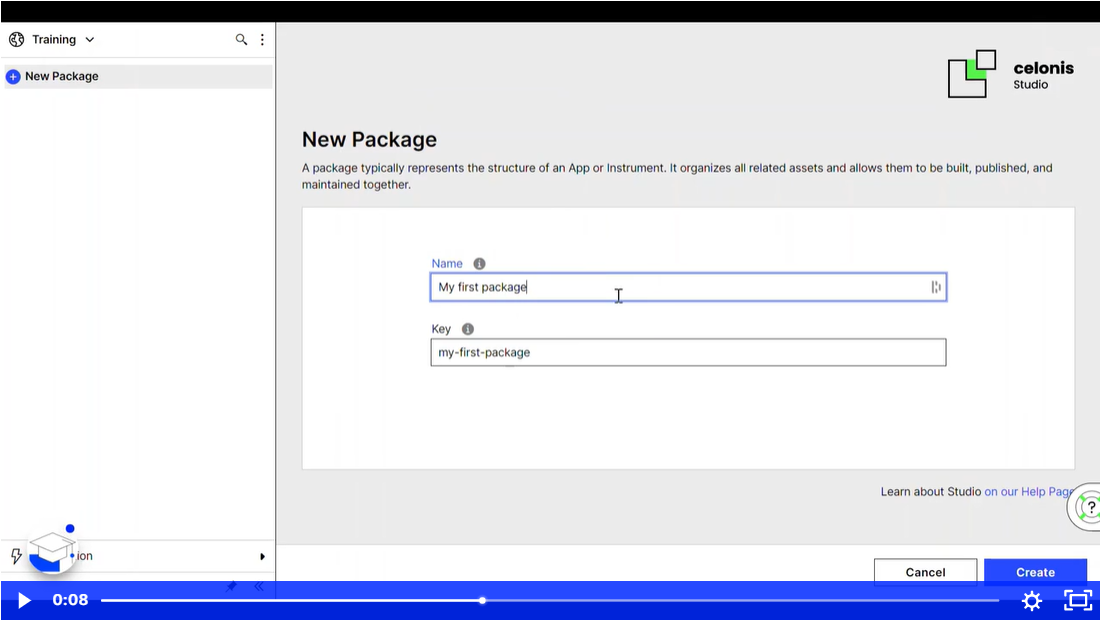
Did you note how the package’s “key” automatically got populated? If not, play the video again.
The key allows you to uniquely identify the package throughout your Celonis team while you can have multiple packages with the same name.
It’s a good practice to never change any key. In the case of packages, it’s not even possible to do so once you’ve created the package. Also, in general, changing the name of an asset that you create in Studio doesn’t have an effect on the key.
Your turn!
Go back to Studio and create a package called “My first package,” just as you’ve just seen it in the video. Make sure to spell it correctly. If you’re unsure what to do, again, you have two options:
-
Rewatch the video
-
Check out the
You can do it!
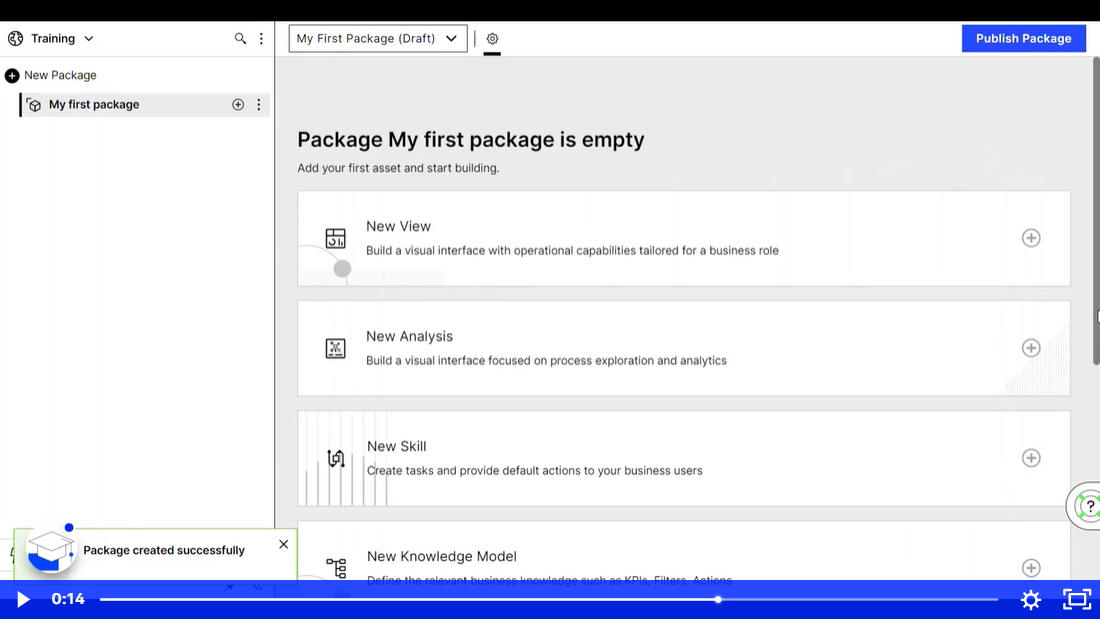
We’ve completed the second step of our Celonis Studio tour and created a package!
From here, you have various options on how to move on while the first two steps - space and package - are always the same.
The options you see at the moment are what we call assets except for the last one, which is a folder for organizing the assets. More on assets in the next section…

01 02 ASSETS IN STUDIO
01 02 01 Put Assets into Context [6:00]
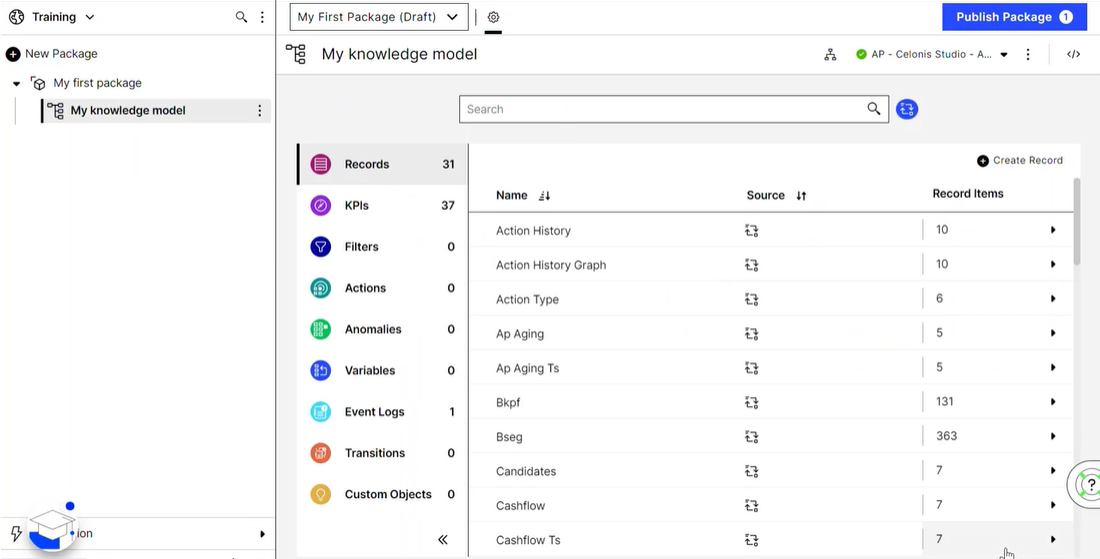
Once you’ve created a Space and a Package in Studio, your set-up is ready to house a variety of assets. Which assets you choose and how you’ll combine them will determine what your final App looks like and the functionalities it provides. Here are the assets you can choose from:
- View
- Analysis
- Skill
- Knowledge Model
- Simulation
- Data Explorer
- Action Flow
For starters, let’s become familiar with Action Flow, Analysis, and Process Simulation as assets, then dive into Knowledge Model and View since things can get a bit nuanced.
- ACTION FLOW
Using Action Flows you can integrate various systems with each other seamlessly. You can, for example, trigger a chain of actions in various ERP systems by the user’s click of a single button in a View.
Of course, there are numerous use cases to utilize Action Flows as a standalone asset without integrating them into an Execution App. Action Flows can be triggered from various applications and through Webhooks. Or they can be scheduled to run automatically according to specific time intervals.
If you’re intrigued, take note to check out the training track, Build Action Flows.
Here’s an example of an Action Flow:

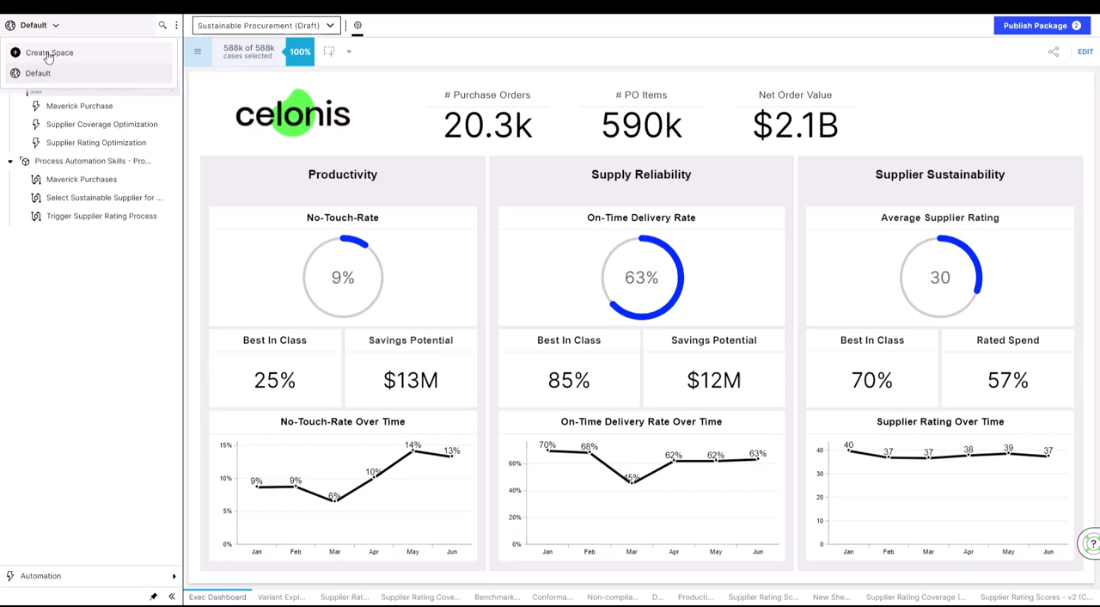
- ANALYSIS
An Analysis is typically used by process experts and improvement specialists to drill deeper into a particular matter of interest. The nature of the Analysis depends on what your process experts and improvement specialists need and what you’ve worked out in the ideation and design phases before you’ve started to learn the mechanics of Studio.
In the Analysis for Sustainable Procurement example below, you can gain deep insights into supplier ratings based on sustainability criteria. If you’d like to learn more about this analysis, listen to Michael.
If you’re interested in learning how to build an Analysis for any use case, you might want to start with the training track, Build Analyses – Basics.

- SIMULATION
Modern organizations are looking for a data-driven way to know beforehand how big or small changes in their processes could impact the process outcome.
Simulation (formerly known as Process Simulation) allows your organization to simulate the full impact of changes in your processes and lets you evaluate all your optimization scenarios.
If you believe this could empower your end-users, take note of the course, Celonis Process Simulation.

As you might have concluded by now, an Execution App is a concept rather than an asset in Celonis. You combine multiple assets, depending on the need, to create an Execution App, where the end goal is to maximize the execution capacity of the organization.
- VIEW (EXAMPLE 1)
What we’re looking at below is an Accounts Payable Execution App, more specifically a View, designed for a manager to monitor KPIs and dynamically set the strategy for the team from within the View.
Take a special note that we look at this app from a developer or app builder perspective and not from an end-user perspective. Accordingly, we are in Studio and not in Apps where end-users go to use the app.

- VIEW (EXAMPLE 2)
This is another View, designed for an operational person in Accounts Payable.
In this View, the business users’ suggested tasks are prioritized based on the KPI that is given priority in the manager’s View. By clicking each invoice, in this example, the operational clerk can review a list of suggested tasks to address any execution gaps.

-KNOWLEDGE MODEL
A View will always require another asset, a Knowledge Model, in order to function. The Knowledge Model is a little like the View’s brain. Can you build a View without a Knowledge Model? Yes, but it doesn’t make a lot of sense.
And here’s why. The Knowledge Model “tells” the View what KPI value to display and where to find information such as Vendor names or company codes in the data model. It contains calculation schemes and PQL functions which are processed in real-time once an action is performed inside a View. Knowledge Models not only define KPIs but also Variables, Filters, and Records amongst other so-called Knowledge Objects.
Both of the Views you reviewed in the previous two tabs were created using this Knowledge Model.

Note that there are no hard definitions in terms of how many or which assets an Execution App consists of. It’s up to you and depends on your individual use case. What will help you though is going through the exercise of defining a proper persona as well as a user journey for the Execution App you want to build . . .
Check out our page on Execution Apps if you would like to become familiar with the purpose-built apps already available through Celonis.
That was a lot to take in. . . Let’s summarize what we’ve covered so far:
- To start in Studio, we need two structural elements: a Space and a Package.
- We can add various assets to a package such as a View, an Analysis, a Knowledge Model, an Action Flow, or a Process Simulation.
- A View always comes in combination with a Knowledge Model.
- A Knowledge Model is created off of a Data Model that the Data Engineer typically has prepared.
- An Analysis can also be combined with a Knowledge Model but doesn’t have to; it can be built directly from a Data Model.
- An Action Flow can be a standalone asset or can be combined with an Analysis or View to form an Execution App.
- Finally, remember that Knowledge Models are hidden from the end-user view, as are Action Flows.
Before we move on, how about we test your understanding? Which assets are only accessible to app builders? Drag and drop them to the “App builders” category. Drag and drop all others to the “Both” (app builders and end-users) category.
Are you excited to add an asset to your package by now? Let’s move on to the next lesson to do so.
01 02 02 Add an Asset to the Package [5:00]
We’re back in our training team where we left off before. The only difference is that we now have a better idea of the different assets represent.
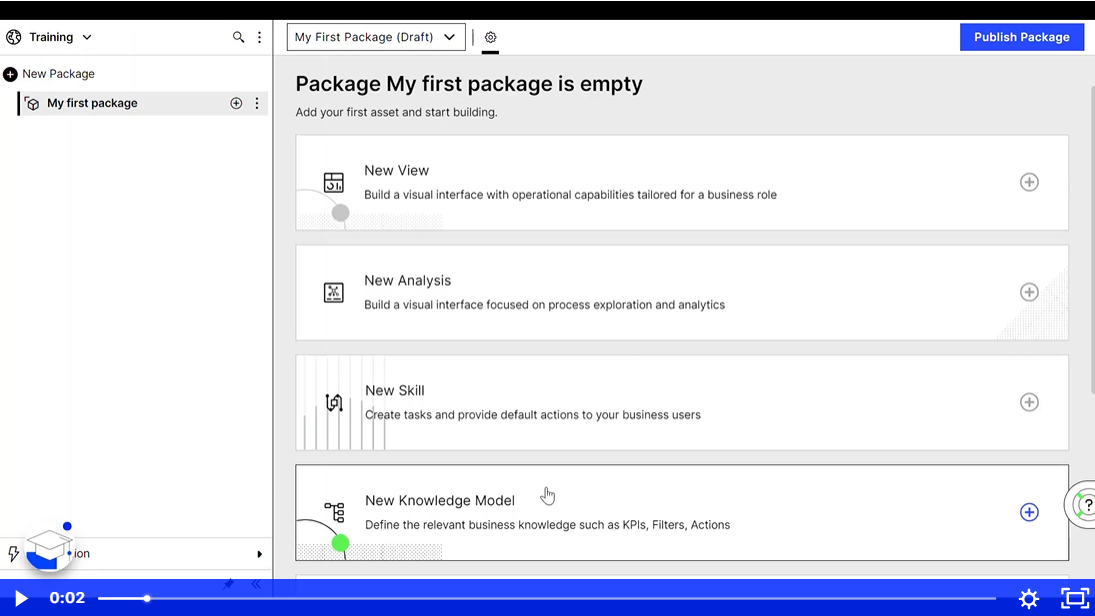
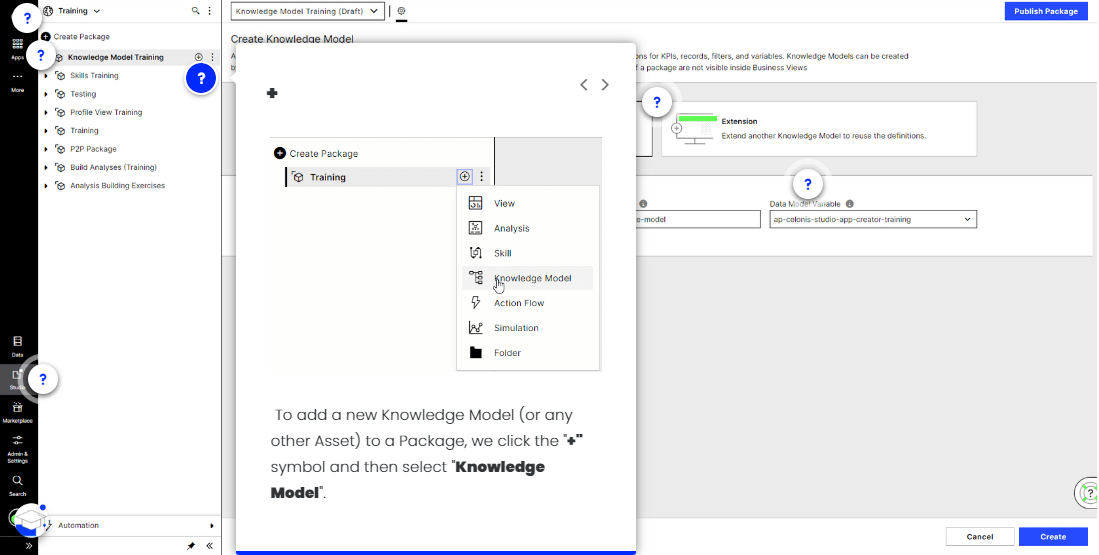
To create an asset, you either click the big tile in the middle or, hover over the package, click the plus (+) symbol, and then choose the type of asset.

Add a Knowledge Model
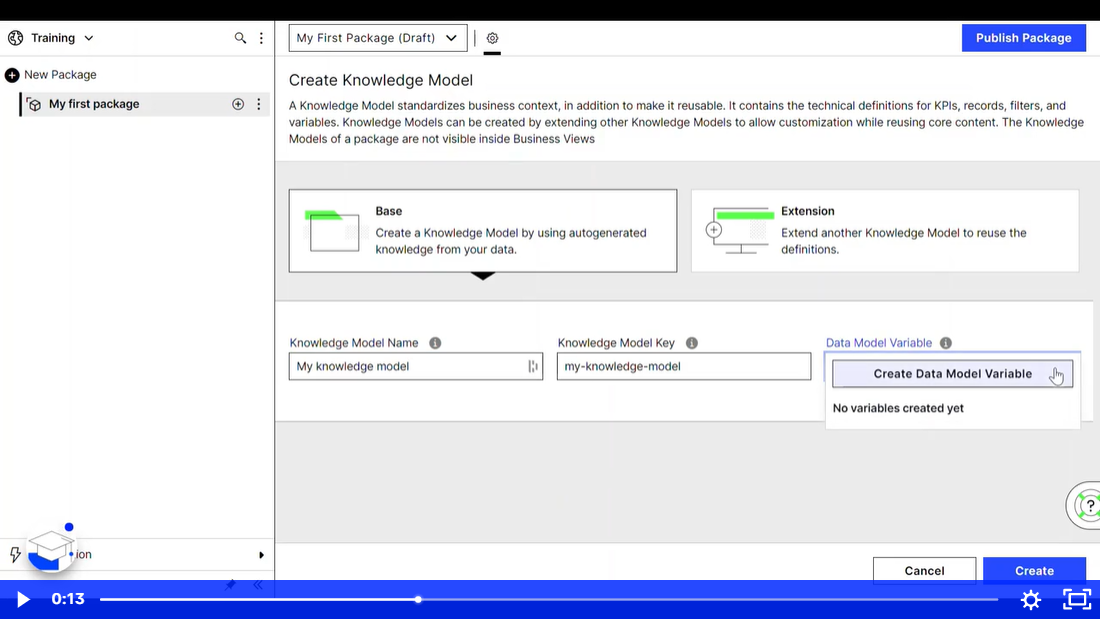
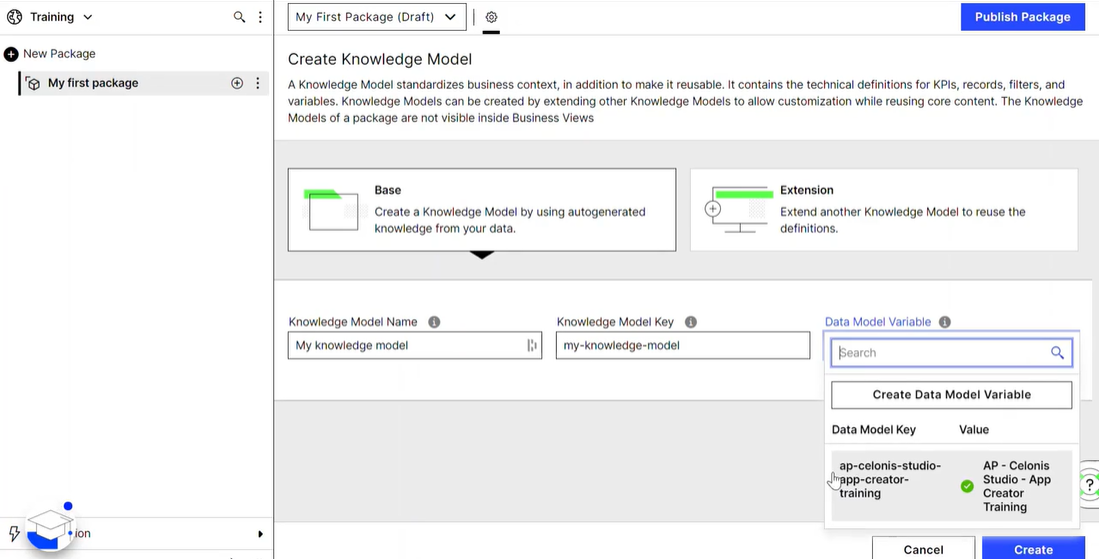
Let’s choose the Knowledge Model as our first asset to add to our package. Remember that we need a Knowledge Model in order to create a View. Upon selecting Knowledge Model we’re prompted to choose from two options: Base and Extension. But what’s the difference between these two?

Creating a Base Knowledge Model means you create one from scratch while an Extension Knowledge Model extends an already existing one.
In the video below, you’ll see that we choose the Base-type Knowledge Model. We specify the Knowledge Model Name and then choose a Data Model Variable. The Data Model variable is the link between the Knowledge Model and Data Model. The exact purpose of the data model VARIABLE will become clearer soon.
And there it is! Our first very small Knowledge Model!
Here’s the question we’ve not asked yet: Where does the data come from that is described in Knowledge Models and displayed in Views? As described previously, it comes from a Data Model that the Data Engineer creates. So, naturally, you want to make sure this has already been done by the Data Engineer by the time you sit down to create a Knowledge Model.
Your turn!
Access your package and create your first asset. You can choose any asset but we advise you to stick to the Knowledge Model. Of course, you can create multiple assets too if you feel like it.
Which resources do you have available in case you get stuck?
→ The video
→ The Documentation
Let’s pause to make sure you have the correct understanding of some of the concepts we covered.
True or False? You can build a Knowledge Model without a Data Model.
-
True
-
False
Once the Data Engineer has prepared the Data Model, you can proceed to build a Knowledge Model off of it.
True or False? You can build a View directly off of a Data Model.
-
True
-
False
First, you need to build a Knowledge Model and connect it to a Data Model. An Analysis, however, can be built directly off of a Data Model.
By now you have a good understanding of creating assets, and you know that the first two steps toward this task involve a Space and a Package.
01 03 ADMINISTERING AND MANAGING STUDIO
01 03 01 Assign Permissions [4:00]
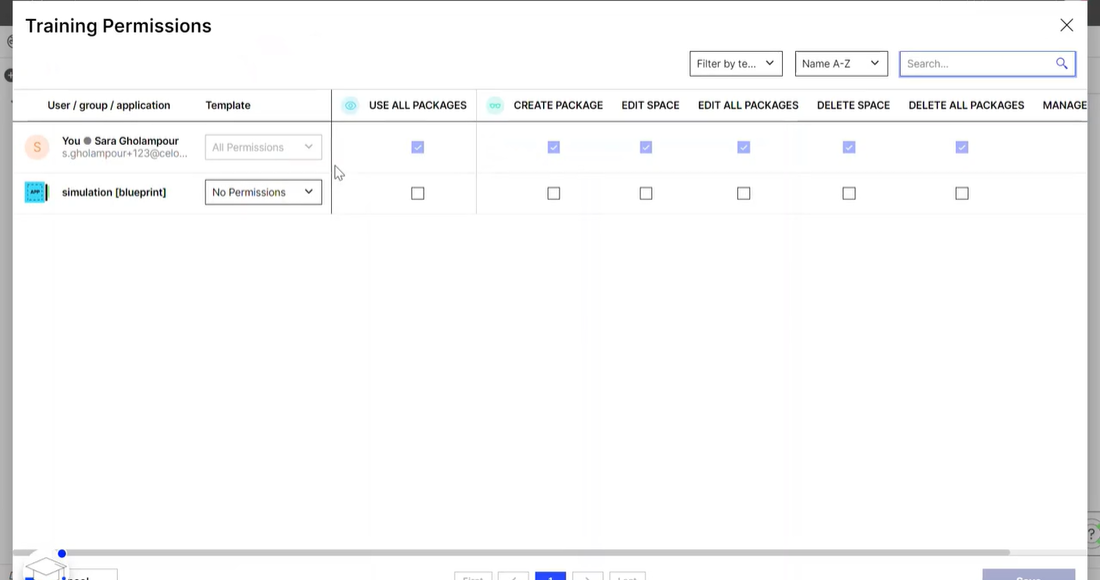
You can assign and adjust permissions in Studio at different levels; in other words, you can define who should be able to view and/or edit all assets in a Space or Package, or a specific Asset(s) in a Package.
Space: Permissions
Let’s look at Spaces first. To review and assign Space permissions, just click the three dots and select the appropriate option. The options are quite self-explanatory and ticking the box lets the permission take effect. If you’d like to review details on the different permission options, please refer to the documentation.
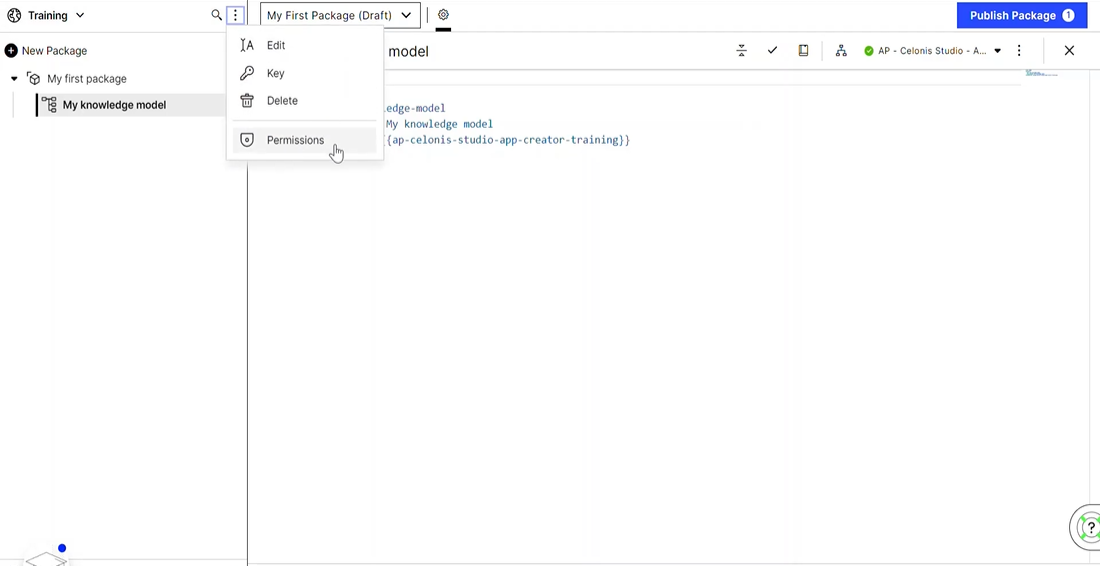
If you have multiple spaces, you might want to apply different sets of permissions. Just click the dropdown arrow next to the Space name to switch to other Spaces first.
Package: Permissions
You can also set permissions at Package-level rather than Space-level.
Go to your training team, find the package permissions available and tick all options below that you find:
-
Use All Packages
-
Edit Package
-
Manage Permissions
-
Edit Space
Pop quiz!
If you want to give a business user Package permission to only use the Package (along with all its Assets) in Apps, what type of permission(s) should you enable?
-
Use Package
-
Edit Package
-
Delete Package
-
Manage Permissions
Not quite. If you hover at the icons beside the “Use Package” and “Edit Package” column headers, you should see the type of role the permissions encompass. Analysts generally require permissions to make changes to the Packages (and Assets), as opposed to Viewers (which include business users), who would only need to be able to interact with the Assets in Apps.
Asset Permissions
You can also assign permissions at Asset-level. But why would you? Let’s say you have organized your assets into Packages by processes. You have an Accounts Payable Package, and within it, you have a Knowledge Model, an Analysis for executives, an Analysis for improvement specialists, and a View for clerks. If you want to give a user access to just one of the Assets (one of the two Analyses or the View), then you’ll want to do so at Asset-level.

What if you want to give a user permission for all the Assets in the Package? How would you do it?
In this case, giving the user the permission at Package-level is more efficient. You see there are quite some options available. As always, it depends on your use case and your end-users’ needs which combination to choose.

Template
Did you notice that as you assign permissions, you also have the option of using the predefined templates?
User permissions are generally for business users or users who only need to access Celonis Apps.
Editor permissions are generally for Analysts or App Developers who need to access the Space/Package/Asset in Studio to make changes.
Have a look at the permission settings of your Package. What type of permission do you have?
01 03 02 Review Package Settings [4:00]
Remember how we briefly talked about Data Model Variables when we created a Knowledge Model? You might have wondered why the term “variable.”

When we created a Knowledge Model, we did so by linking it to a single Data Model. This is important to remember. We can associate only one Data Model with each Knowledge Model. In addition, a View can be linked to a Knowledge Model.

What about a Package? How many Knowledge Models and Data Models can it be associated with? Since a package can hold multiple assets, and therefore multiple Knowledge Models, we can conclude that a Package can reference multiple Data Models.
Now hopefully the word “variable” in the term “Data Model Variable” starts to make more sense. Imagine we have one Package which holds multiple Knowledge Models (which are referenced by different Views). There might be multiple Knowledge Models that reference the same Data Model. What if you had to change that Data Model? Would you have to go into each single Knowledge Model and adjust it? No, luckily not! That’s exactly what the Data Model Variables are for; you only change it at one place and it automatically applies to every asset that is referencing this data model variable. Cool, right?
Data Model Variables
Let’s take a look at where we can see all the Data Model Variables associated with a Package.
Data Model Variables Let’s take a look at where we can see all the Data Model Variables associated with a Package.
Step 1
Package Settings

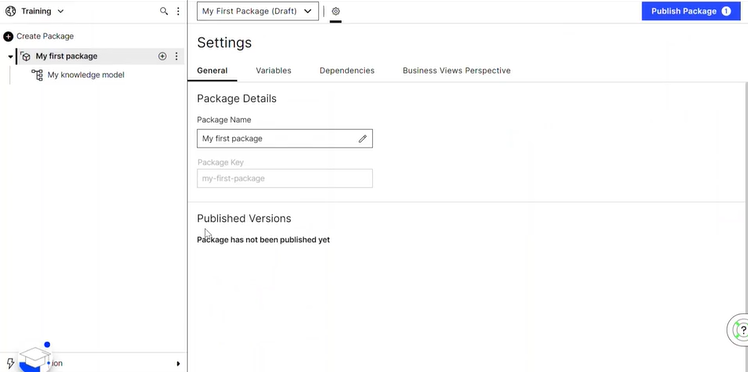
All Data Model variables of a package are listed in the package settings. You can access those by clicking the three dots and then selecting “Settings”.
Step 2
General tab

There are a few tabs in the Package settings, such as General, Variables, and Dependencies.
What you can see in the General tab is what you already saw before: The Package name and its key. Here’s where you would change the Package name, but keep in mind, the key will remain the same as the one when you created the package in the first place. Below the name and key, you see Published Versions. We’ll touch soon on what is meant by the Published Versions.
Step 3
Variables tab

In the Variables tab, you see the Data Model Variable we created while setting up the Knowledge Model. You can create as many Data Model Variables here as you like. Especially when you download an Execution App from the EMS store, your first step will most likely be to assign a Data Model Variable.
Now you check it out!
Go to the Package Settings and take a look at the tabs.
Question for you…
If you’re not already in Package Settings, do access it to answer the question below.
What is the definition of a Package dependency?
-
Dependencies show data models and variables that the Package is associated with.
-
Dependencies are other Packages that are required for this Package to operate.
-
By adding a Package as a dependency, its Views and Knowledge Models can be reused using this extension mechanism.
Check out the Dependencies tab in Package Settings to see for yourself.
01 03 03 Publish a Package and Work with Versions [3:00]
Did you note the little number in the “Publish Package” button on the top right when you added your first asset?
Any changes you make within Studio will be automatically saved as a draft. Changes include:
-
Adding an Asset
-
Deleting an Asset
-
Modifying an Asset

However, business users will not see these changes (in Apps) until you publish them to the team. Some modifications in Studio might only be possible or have an effect after you’ve published the package.
Your turn!
Go to your training team and give it a try: Publish your package by clicking the respective button.
Since this is very likely the first time you publish the package, you can keep the suggested version number (1.0.0).

Best Practice for Versioning
Did you wonder how to specify the version number? As the pop-up window indicated, it should be assigned in the format of “Major.Minor.Patch.” Click through the categories below to find out about best practices.
Major
A complete update or shift in the current asset. Changes would greatly affect Business Users if no communication were properly given in advance.
Minor
Tweaks in the apps that won’t necessarily require communication or messaging to Business Users. Examples include tweaking a KPI, making color changes, or changing chart types in a View asset.
Patch
Very small changes that may go unnoticed to a Business User. Examples include an update to the calculation of a KPI, or changes in titles.
The Studio saves all published versions so you can always switch back to a previously published version. You can see this in the Package’s Settings, the General tab.
You probably know the concept from Dropbox, Google Drive, or similar applications. It’s super handy and there will be situations in which you will be very glad that this functionality exists ;-)

You’re now able to explain the basics of Celonis Studio, and know how to add Spaces, Packages, and Assets. Congrats!
Don’t forget to use the “Exit Course” button!
02. YAML Basics : ELECTIVE
-
YAML Basics
-
Learn the basics of the data serialization language YAML.
Hey there! Welcome to YAML Basics! If you plan to build Knowledge Models and Views, and you don’t know anything about YAML yet, then this module is for you. You’ll be in a good position to take this training if you can roughly explain what JSON, XML, or HTTP is.
One technical remark: If you would like to take a break during the training, remember to close the course using the “Exit Course” button in the top right of the window first before closing your browser window. Otherwise, your progress could get lost.
The course will require about 18 minutes of your time and the breakdown for each section can be found beside the lesson title.
02 01 When to use YAML [3:00]
The course description already said it: If you want to build a Knowledge Model or a View, what you’ll need to be able to read, understand, adjust, and write is YAML - a generic data serialization language.
With YAML, you can define how your View should look and how the Knowledge Model is constructed.

Although both assets can also be built using the Visual Editor, bear in mind that there’s still a lot of development going on. This means that not all components are ready to be built solely by using the Visual Editor.
Maybe you’re not that much of a Visual Editor person. Maybe you would even prefer to write YAML scripts instead - which a lot of people still do.
Can you utilize the YAML Editor in Studio?
If you have already created a Knowledge Model or a View in the Celonis Studio, go ahead and open the YAML Editor. The YAML editor is where you’ll script your YAML configurations.

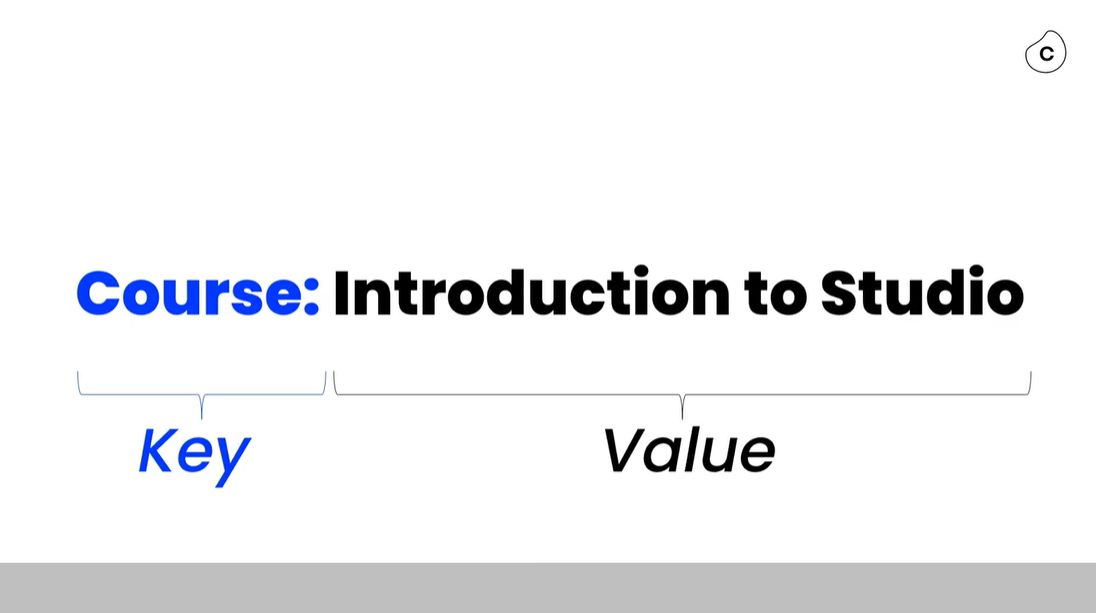
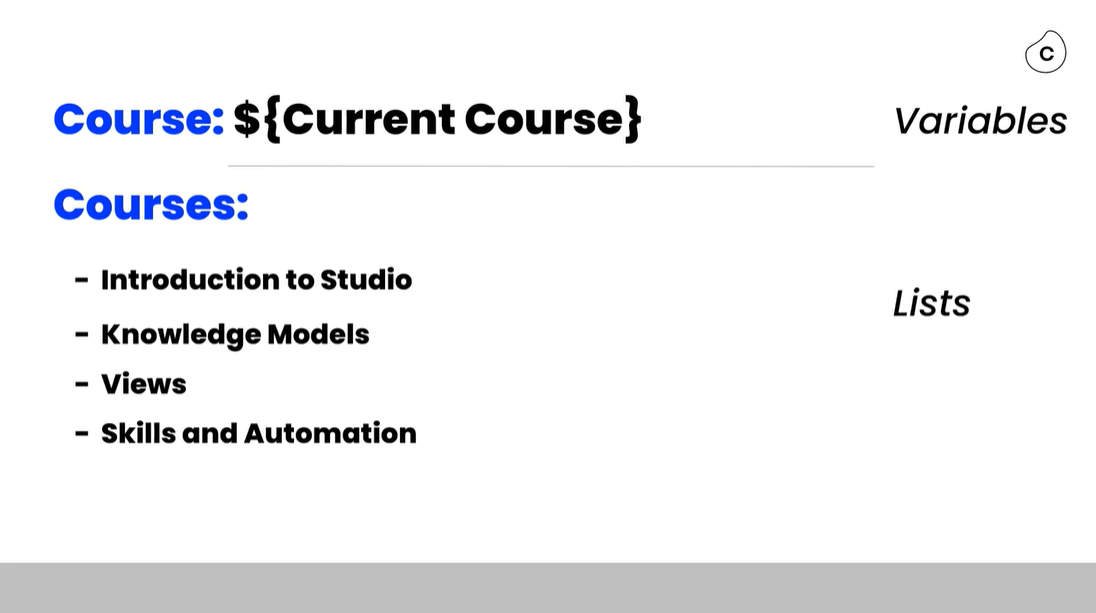
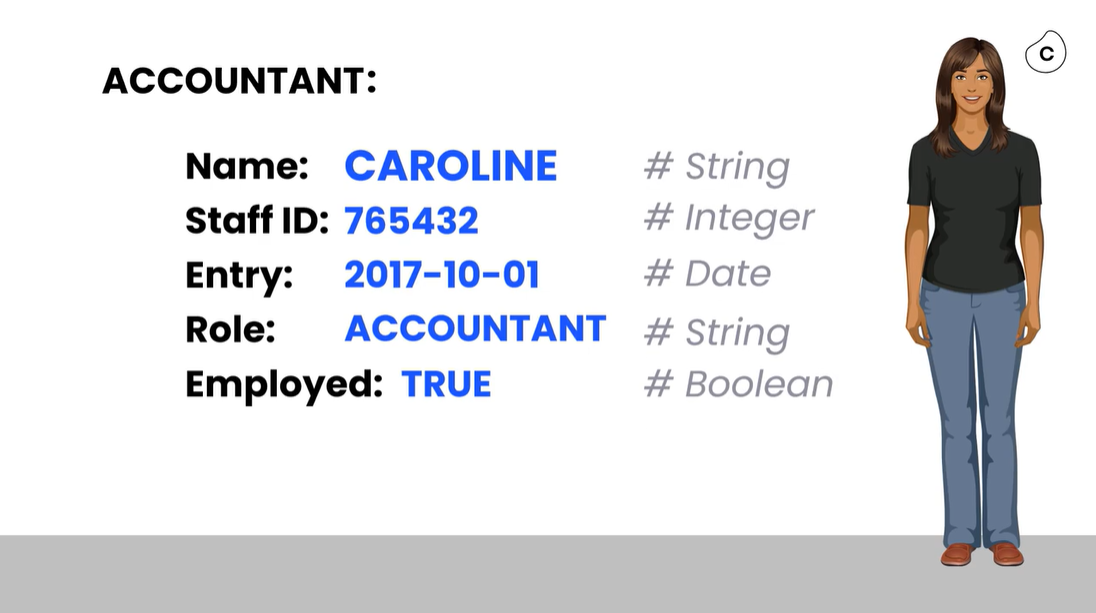
02 02 The general structure of YAML [05:00]

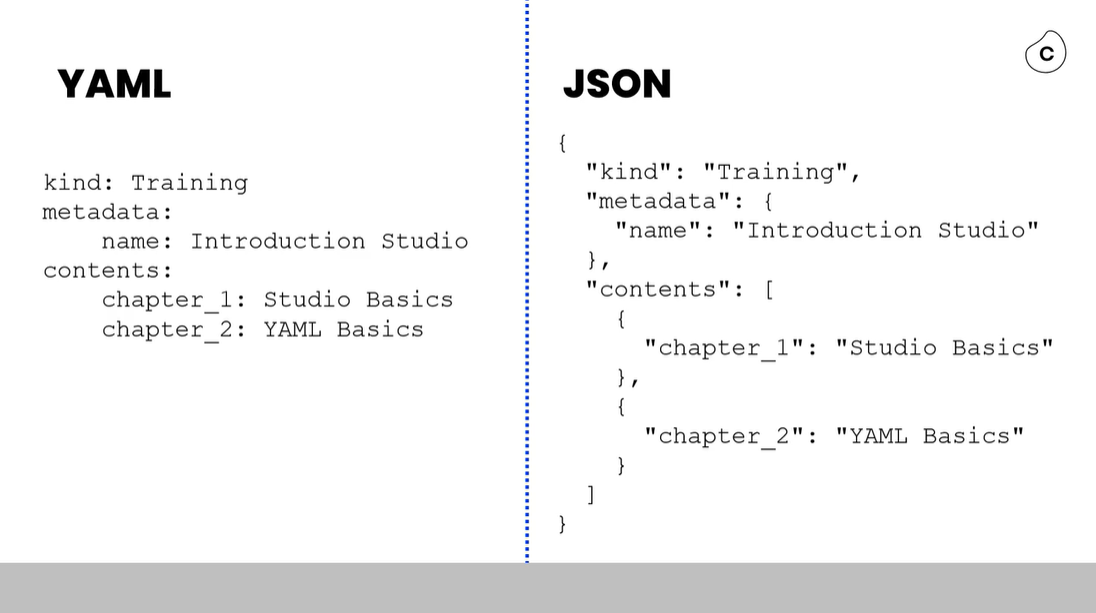
Here are some additional resources you can leverage to learn about YAML:
02 03 Test your YAML knowledge [10:00]
Did you take some time to understand and recap what’s been going on in the video in the last lesson? Remember that the video’s intention is for you to press pause and repeat it as often as you need it!
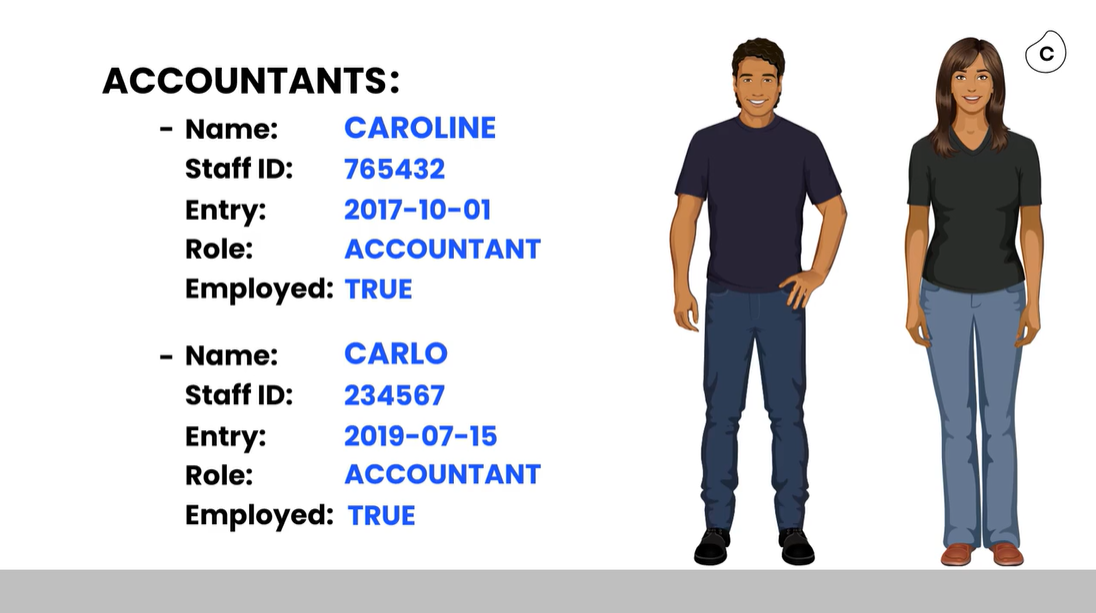
Check out the code snippet below which is a piece of a View and then answer some questions about it.
metadata:
  key: steering-view
  template: false
  name: Steering View
  knowledgeModelKey: knowledge-model-views-training
  profileView: false
variables:
  - name: currentKpi
    defaultValue: DPO_KPI
    type: STRING
  - name: currentKpiName
    defaultValue: Process Cycle Time Days
    type: STRING
How many different objects can you identify?
-
2
-
4
The metadata, the variables and each item in the list counts as one object.
The YAML Editor in Studio does a pretty good job to validate everything you type on the go…

Check out the error above - can you name what is causing the error? How would you try to resolve it?
-
The indentation of the key ‘defaultValue’ is wrong. Deleting the space in front will resolve the error.
-
The value of the parameter ‘name’ is wrong. It should be changed to ‘Process Cycle Time Days’.
Well done! You’ve already reached the end of this course. Don’t be scared when you see a fully mature Knowledge Model or View YAML configuration for the first time. It will look a little complex but if you understood the concept covered in this module you will find it easy to figure everything out.
Thanks for taking this course! We hope you enjoyed it.
Your Celonis Academy
03.The Interdependence of Knowledge Models and Views : REQUIRED
-
The Interdependence of Knowledge Models and Views
-
Understand how Knowledge Models & Views co-exist with each other.
Welcome!
Hey there! Welcome to this module! Make sure you’ve taken the course “Navigate the Celonis Studio” or at least have a good idea of what an “Asset” is in Celonis Studio before starting this one.
We’ll require about 12 minutes of your time for this module.
One technical remark: If you want to take a break, remember to close the course using the “Exit Course” button in the top right of the window first before closing your browser window. Otherwise, your progress could be lost.
03 01 ANALYZE THE RELATIONSHIP BETWEEN KNOWLEDGE MODELS AND VIEWS
03 01 01 Knowledge Model? View? [2:00]
“A Knowledge Model is like the brain of a View”
-Someone at Celonis, probably
If this quote makes 99.9% sense to you by the end of this module, then we did our job right!
But let’s start from the top.
What does a View look like? And what about a Knowledge Model? Browse through the following examples to get a better idea.
Example 1
Hey there! I’m a View!

My name in this example is “Steering View”.
Example 2
Hi :) I’m a View, too!

My purpose is different from the Steering View. So I look different and also have another name, “Action View”. Technically speaking I’m still a View though.
Example 3
Greetings! I’m a Knowledge Model.

Both the Views you’ve seen before would literally be nothing without me. Without me, they wouldn’t know which numbers to display or where to get the information about open invoices from.
No View without a Knowledge Model and vice versa.
Using the View asset, you define the components that the end-user will work with; components like, charts, tables, lists, and dropdowns.
Those are all visual presentation components though. You define the content that these components display by defining Knowledge Objects in the Knowledge Model; objects such as KPIs, benchmarks, variables, and filters.
So you see, View and Knowledge Model can’t live without each other. A View without a Knowledge Model cannot display meaningful content and a Knowledge Model cannot show itself to end-users, because it’s really a collection of formulas and definitions. Only together, can View and Knowledge Model create contextual business interfaces like a Steering View or Action View.
03 01 02 An Abstract Example of the Knowledge Model-View Relations…
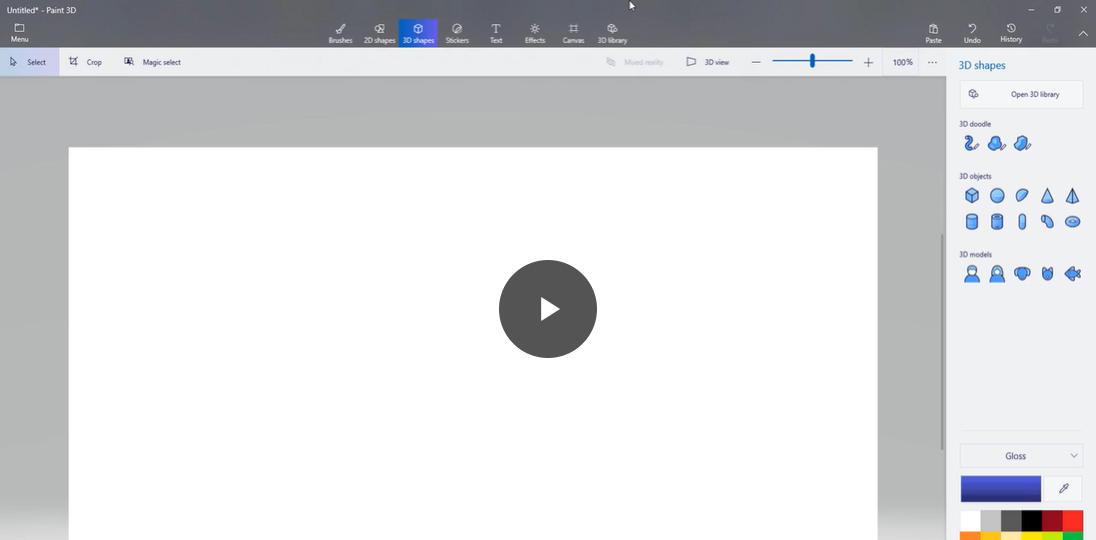
The interactions between the Knowledge Model and the View can be a little complex to understand when you’re just getting started. This is why we’d like to provide a little analogy to you. Maybe it helps you.
But… how does this help us to better understand the relationship between Knowledge Models and Views? Well, there are actually quite some connections we can draw.
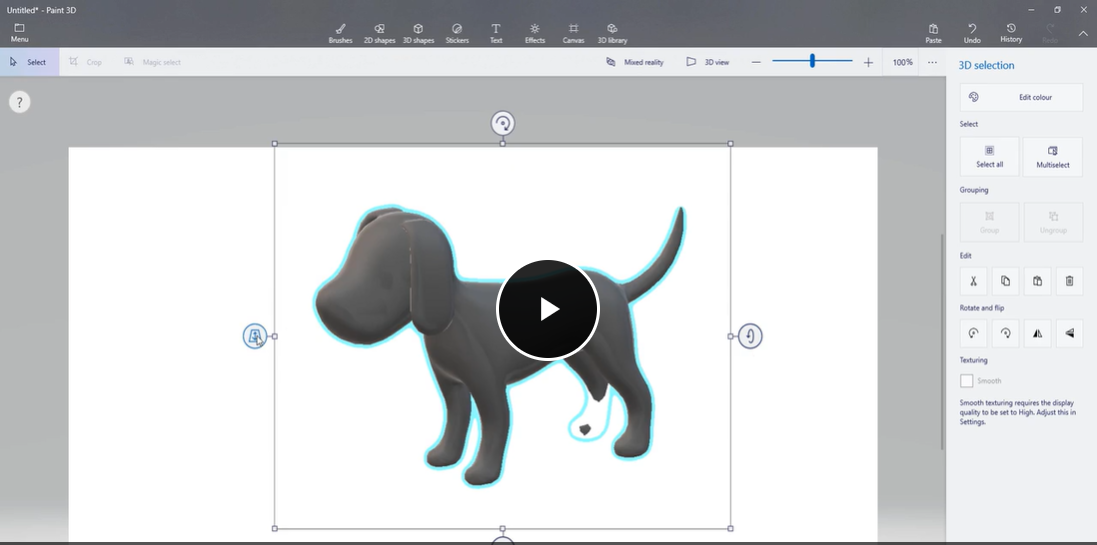
View
Adding an element
We knew we wanted to add a dog to the canvas which is a pre-configured element in Paint. Pre-configured elements are also available in Views. Here, we call those elements ‘components’. You’ve seen a couple of those before, like a table, a chart or a KPI list.

Knowledge Model
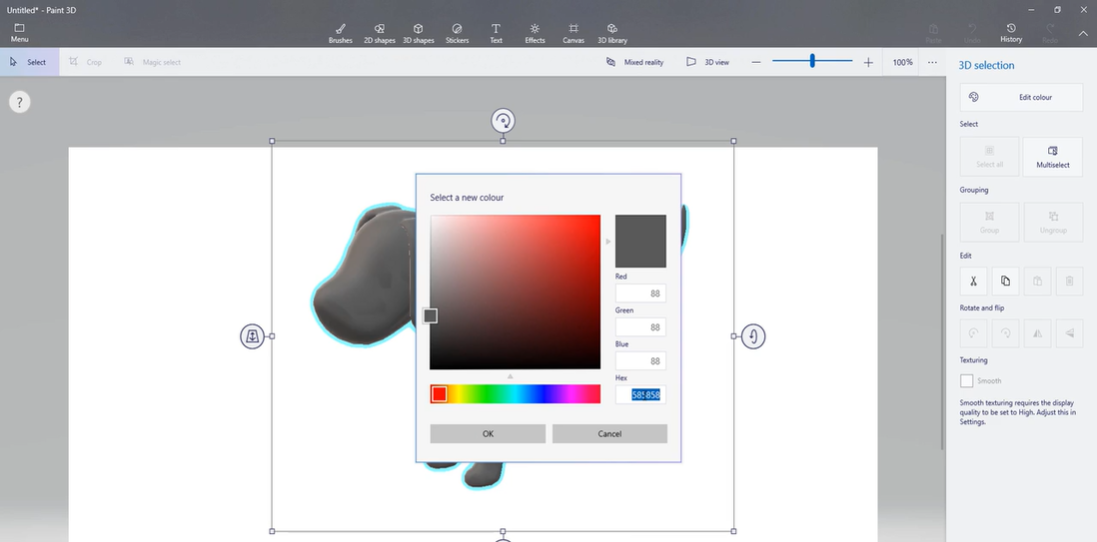
Selecting an available colour
Our dog is supposed to be blue. So we checked the colour palette. That’s similar to adding a KPI to a View: Imagine we’d like to add the KPI “Average Days Lost”. We’d need to specify such a KPI in our Knowledge Model so we can add it to the View.

Knowledge Model
Adding a new colour
Do you remember how we didn’t find the correct blue shade and defined a new one using the HEX code? Remember we’d like to add the KPI “Average Days Lost” to our View. Everything that the Knowledge Model provides though is “Average Weeks Lost”. So we add “Average Days Lost” to the Knowledge Model accordingly.

View
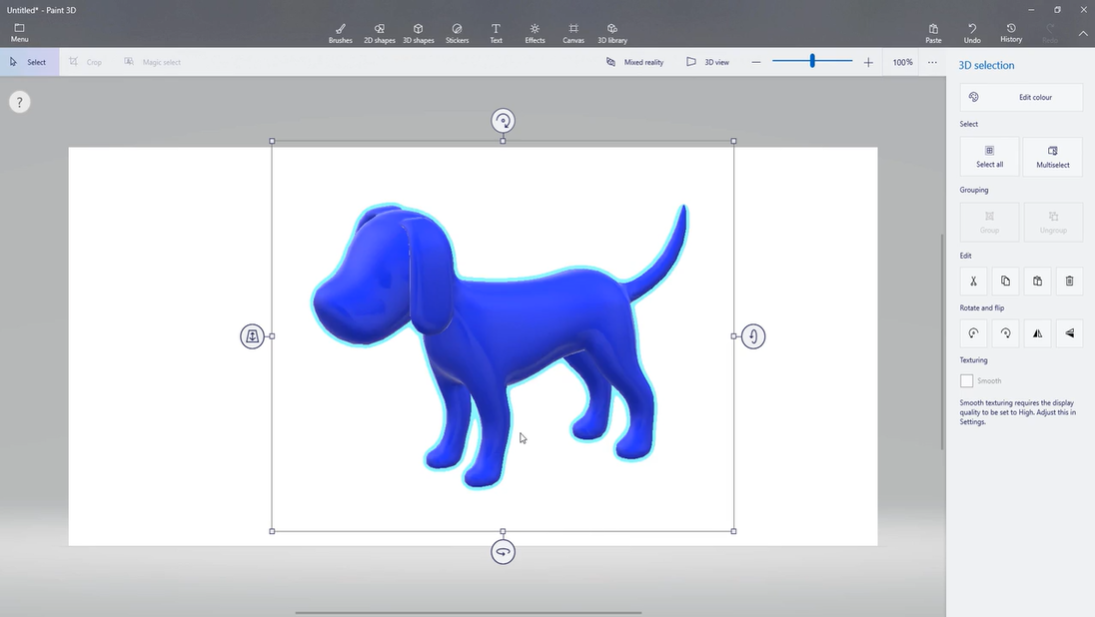
Applying the new colour
Similar to when we applied the specific blue shade to the dog, we can now also reference the newly created KPI “Average Days Lost” in our View.

Hopefully this example gives you a better idea of when to make changes in a View and when to adjust a Knowledge Model. With your analogy in mind, try to match the activities below correctly, as in whether you would access the Knowledge Model or rather the View to perform them.
03 02 Distinguishing between the Visual and YAML Editors [2:30]
Knowledge Models and Views are the only assets in Celonis Studio that - in their core - are configured using YAML, a generic data serialization language. You are familiar with YAML, right? If this is not the case yet, please make sure to invest some time in YAML Basics.
You can configure Knowledge Models and Views using either the YAML Editor or the Visual Editor. But some components (in Views) and Knowledge Objects (in Knowledge Models) can only be configured using the YAML Editor. Note that we are continually working to improve the Visual Editor, so keep an eye on updates!
What is the difference between the Visual and the YAML Editor?
You might be able to answer this question yourself when you compare the screenshots below.
KNOWLEDGE MODEL
The left picture shows the Visual Editor, the right one the YAML Editor. Both show the same Knowledge Model but a different interface to interact with.

VIEW
Again, the left picture depicts the Visual Editor while the right one shows the YAML Editor. Same View but different ways to edit it.

Looking at the screenshots above, select all statements that appear to be true about the Visual and YAML Editors for Knowledge Models and Views:
-
The Visual Editors work according to a “What you see is what you get” principle
-
You can easily switch back and forth between the Visual Editor and the YAML Editor at any time
-
Using the Visual Editor is easier than using the YAML Editor
03 02 01 BRINGING IT ALL TOGETHER
03 02 02 Knowledge Models and Views in the Big Picture [3:00]
The main objective of this course is for you to truly understand the system dynamics that emerge from the relationship between Knowledge Models and Views.
A View doesn’t make sense without a Knowledge Model and vice versa.
Once you start building a Knowledge Model and a View yourself, always keep that in mind.
Where does the data come from?
You might have noticed that we only talked about displaying (in Views) and calculating (in Knowledge Model) values of Knowledge Objects so far. Please make sure that you understand the following:
A Knowledge Model does not house data. But it knows where the data resides within the Data Model.
To communicate with the Data Model, the Knowledge Model ‘speaks’ Process Query Language (PQL). This is why most of the Knowledge Objects you’re going to implement in your future Knowledge Models will require you to specify a PQL formula.
Let’s bring it all together
We just sneaked in a couple of additional terms, so let’s put all of them in context:

You will see the graphic again in the next courses on building Knowledge Models and Views. Hopefully it helps you to understand where you are on your journey.
03 02 03 Congrats! [1:00]
You have now reached the end of this course. We hope it was helpful for you to understand the relationships discussed here before you go in and build Knowledge Models and Views yourself.
If you have also already completed the course “Navigate the Celonis Studio”, you are now ready to embark on the two courses “Build a Knowledge Model” and “Build a View”.
We hope you’ve enjoyed this course. We’re looking forward to welcoming you back to the Academy platform soon!
Your Celonis Academy
04. Build a Knowledge Model : REQUIRED
-
Build a Knowledge Model
-
Set up a Knowledge Model and add a KPI and a Record to it.
Hey there! Do you want to learn the mechanics of how to build a Knowledge Model in Celonis Studio? Then this course is for you! There is one question we’d like to ask you right away:
Would you build a Knowledge Model with no View and vice versa?
If you don’t know how to answer this question or if you respond with “Yes”, then please take the course “The Interdependence of Knowledge Models and Views” first. Otherwise, you’re good.
Additionally, we assume that you are familiar with Celonis Studio and can access your Training Team to create Spaces and Packages on your own there. Otherwise, please embark on the course “Navigate the Celonis Studio” first. Last but not least, YAML should be something that you feel comfortable reading and writing. Otherwise, our course “YAML Basics” could help you out.
We’ll require about 50 minutes of your time to walk you through this course.
One technical remark: If you would like to take a break during the training, remember to close the course using the “Exit Course” button in the top right of the window first before closing your browser window. Otherwise, your progress could get lost.
04 01 CREATE A NEW KNOWLEDGE MODEL
04 01 01 Refresher on the Definition of a Knowledge Model [2:00]
It is finally time for you to build a Knowledge Model! Maybe it’s been a while since you’ve worked on the prerequisites of this course though, so let’s quickly recap what a Knowledge Model actually is.

A Knowledge Model is like a glossary or a collection of formulas and definitions. It captures the business context of processes and stores definitions of KPIs, Records, Variables, Filters, and many more Knowledge Objects.
Why do we need Knowledge Models?
One of the main advantages of Knowledge Models is the reusability of their Knowledge Objects’ definitions.
Imagine you build three Views that are tailored to different personas. Each View displays the same KPI but at different positions. Wouldn’t it be tedious to add the KPIs’ calculation scheme to each View although it remains the same across the Views? Now imagine something changes in the KPI definition and you have to access each View that uses the KPI and adjust it accordingly… Lucky for us, we have a Knowledge Model which we only need to access once. Changes in the Knowledge Model become effective immediately for each asset that references it.
The concept is similar to object-oriented programming where you define classes and methods, and reuse those throughout your app.
In a nutshell, these are the key benefits and reasons for Knowledge Models:
-
Reusability
-
Scalability
-
Consistency
What does a Knowledge Model need?
Before we create a Knowledge Model, we assume that a Data Model is already in place to link to our Knowledge Model. A Data Model is typically provided by a Data Engineer. If you are required to create a Data Model yourself, we recommend our training track “Get Data into the EMS”.
Now that we remember what a Knowledge Model is, we’re ready to create one in Celonis Studio. Let’s go!
04 01 02 Create a new Knowledge Model [4:00]
Given that we are inside of Celonis Studio, what do we (technically) need to create a new Knowledge Model?
-
a Space
-
a Package
-
a Folder
-
a View
Let’s review how to create a new Knowledge Model.
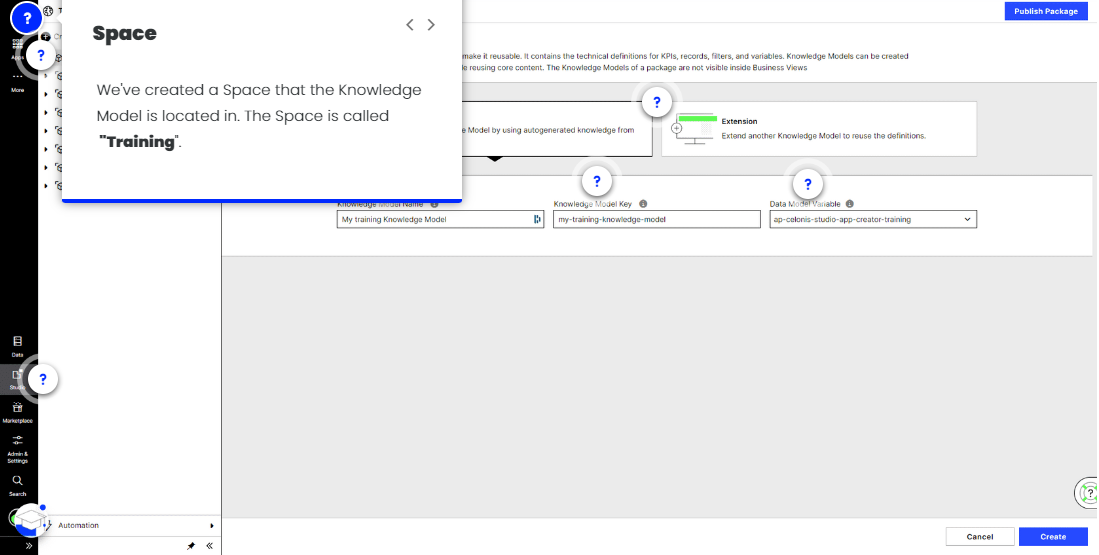
Space
We’ve created a Space that the Knowledge Model is located in. The Space is called. Training.
Package
We can’t add a Knowledge Model to a Space; we need a Package to house the Knowledge Model in. In this case, the package is called Knowledge Model Training.
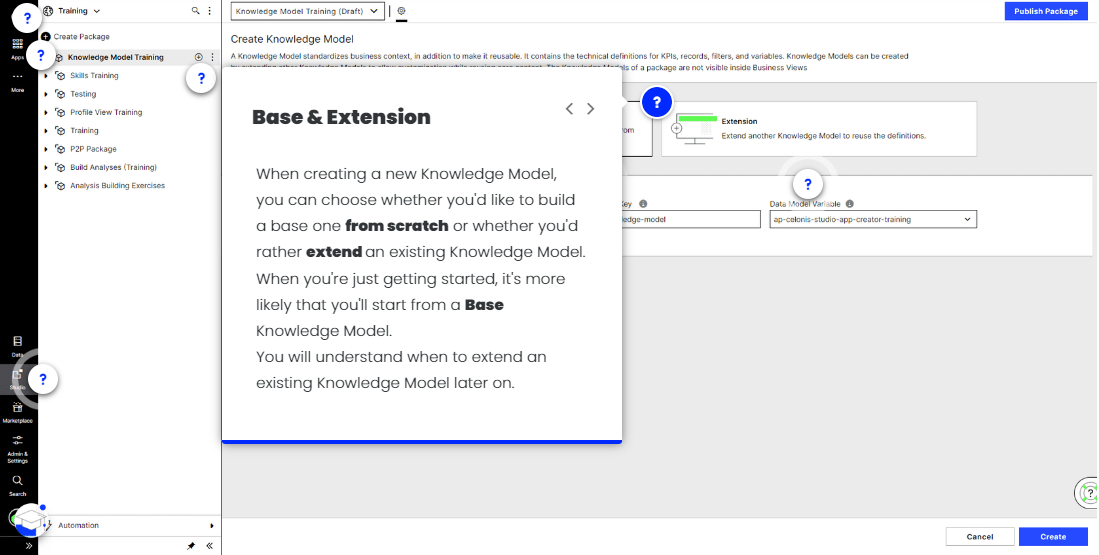
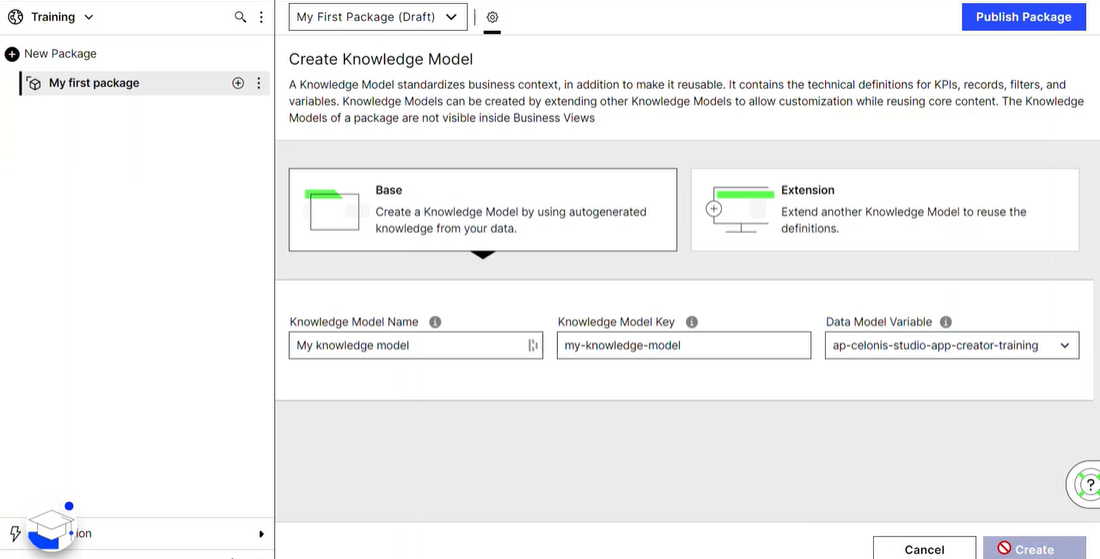
Base & Extension
When creating a new Knowledge Model, you can choose whether you’d like to build a base on from scratch or whether you’d rather
extend an existing Knowledge Model. When you’re just getting started, is’s more likely that you’ll start from a Base Knowledge Model.
You will understand when to extend an existing Knowledge Model later on.
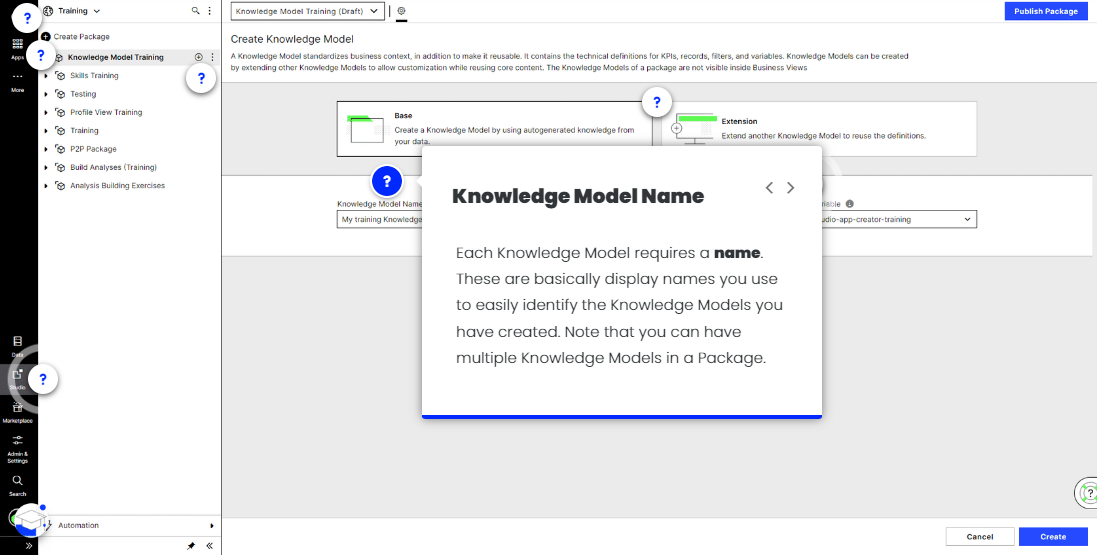
Knowledge Model Name
Each Knowledge Model requires a name. These are basically display names you use to easily identify the Knowledge Models you
have created. Note that you can have multiple Knowledge Models in a Package.
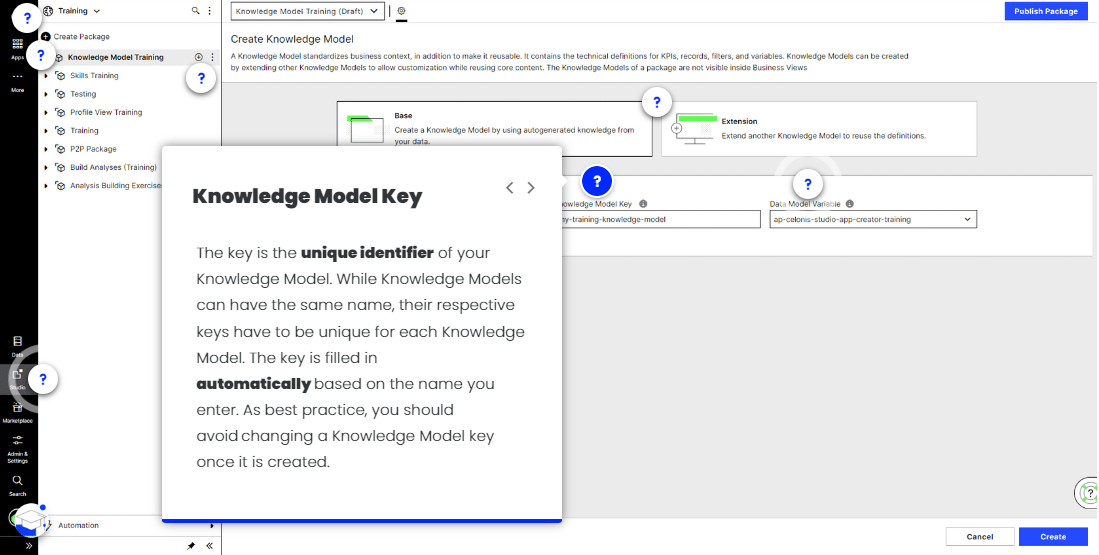
Knowledge Model Key
The key is the unique identifier of your Knowledge Model. While Knowledge Models can have the same name, their respective keys have to be unique for each knowledge Model. The key is filled in
automatically based on the name you enter. As best practice, you should
avoid changing a Knowledge Model key once it is created.
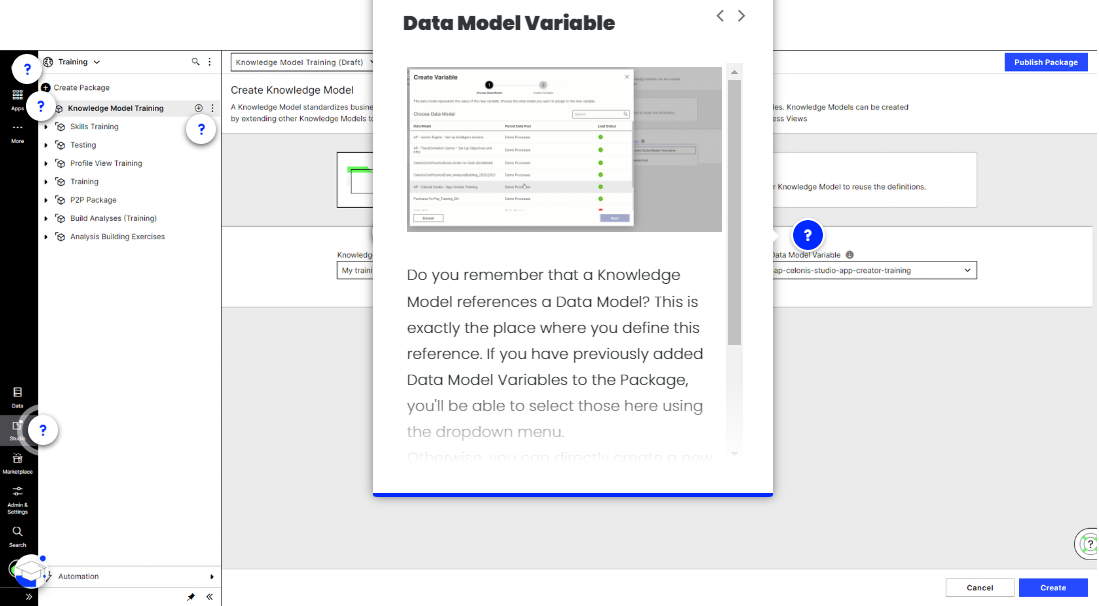
Data Model Variable
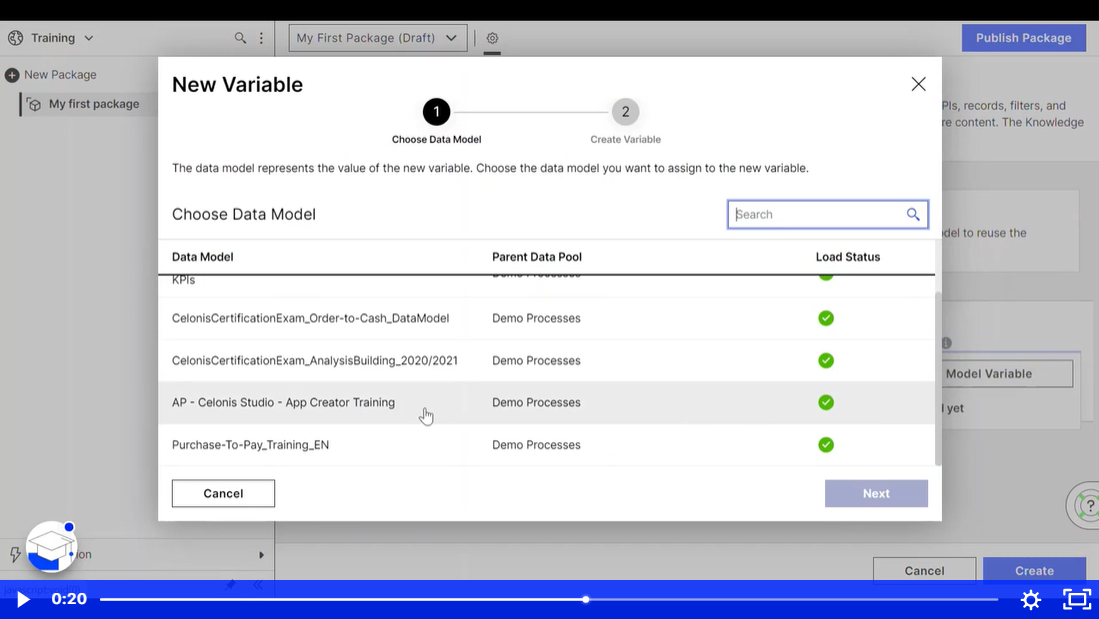
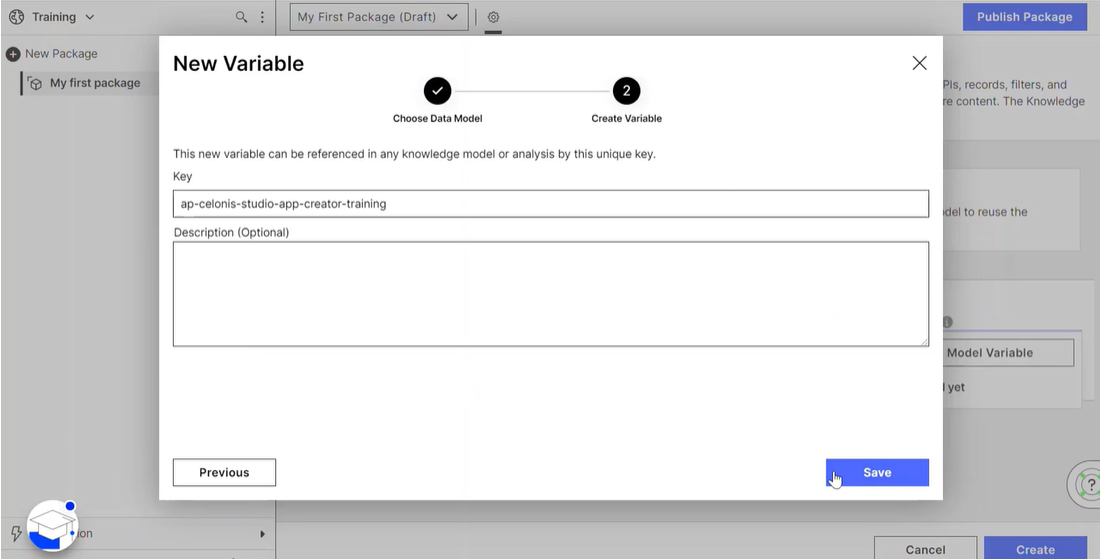
Do you remember that a Knowledge Model references a Data Model? This is exactly the place where you define this reference. If you have previously added Data Model Variables to the Package, you’ll be able to select those here using the dropdown menu.
Otherwise, you can directly create a new Data Model Variable (that is a reference to a Data Model which you can access in your Celonis Team) in the Knowledge Model configuration panel, which is also accessible via the dropdown menu.
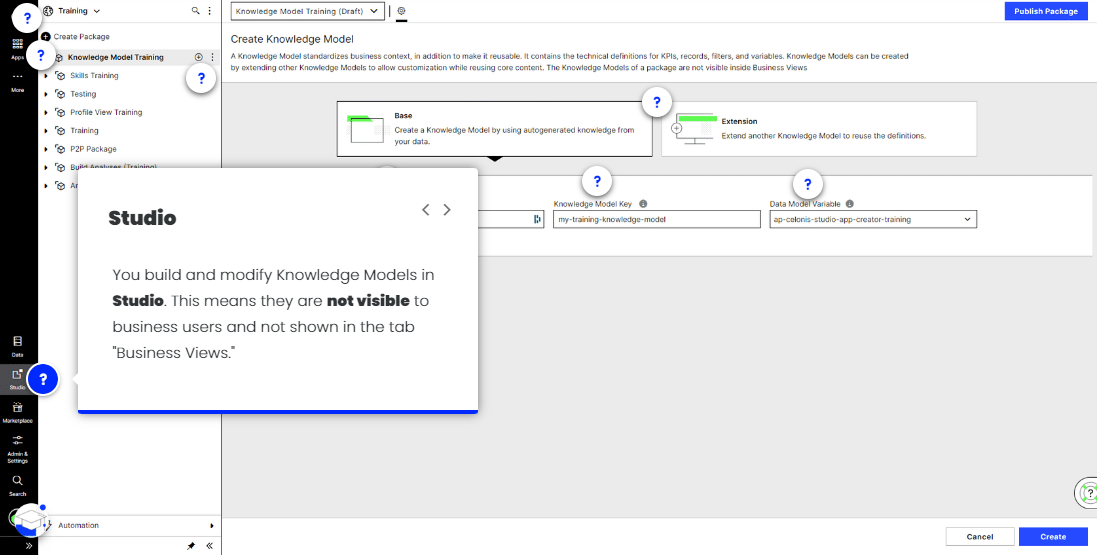
Studio
You build and modify Knowledge Models in Studio. This means they are not visible to business users and not shown in the tab Business Views.
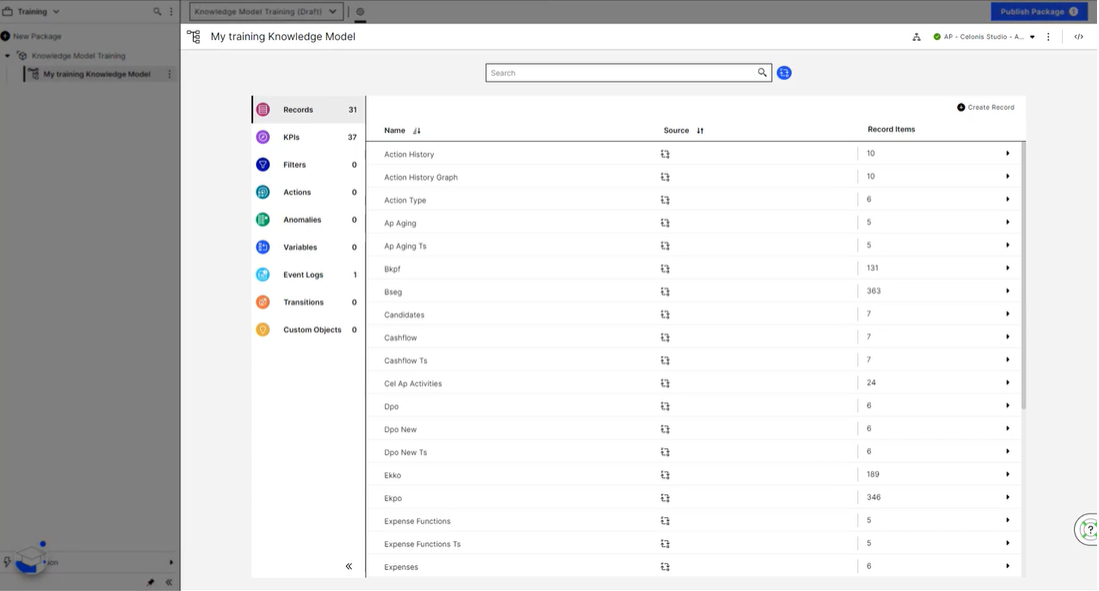
Your Turn!
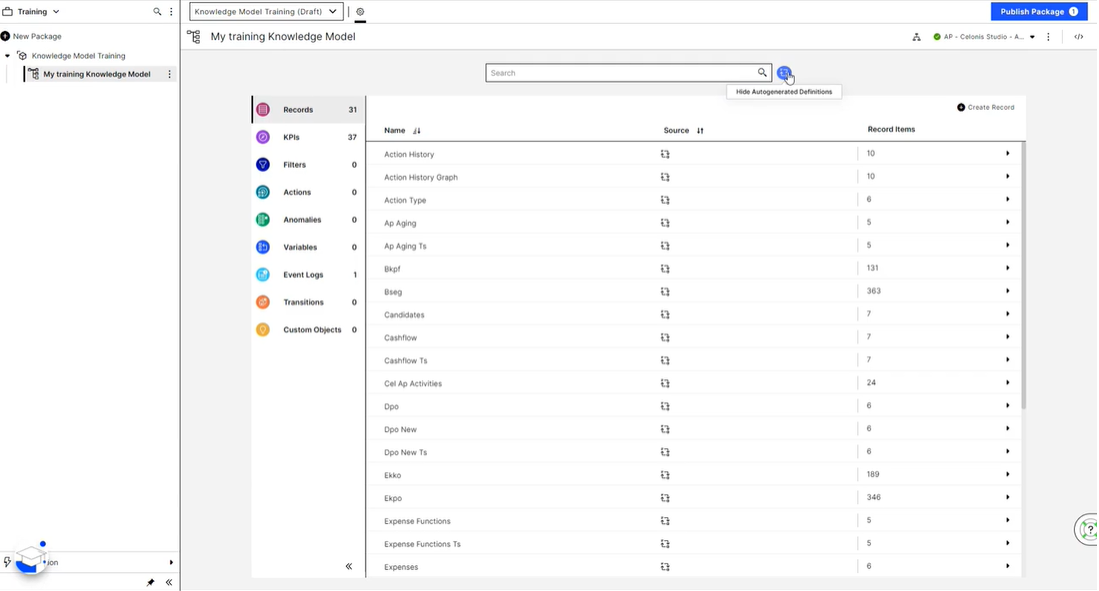
Go to your training team and create a new Knowledge Model called “My training Knowledge Model”. Here’s a checklist on what to do - make sure you can tick each box before you continue with the course:
-
Create a new Space or reuse an existing one. Call it “Training”
-
Create a new Package or reuse an existing one. Call it “Knowledge Model Training”
-
Add a Knowledge Model to the Package. Choose the Base type and call it “My training Knowledge Model”
-
Add a Data Model variable and select the Data Model “ap-celonis-studio-app-creator-training”
What you see in your training team now should look like this:

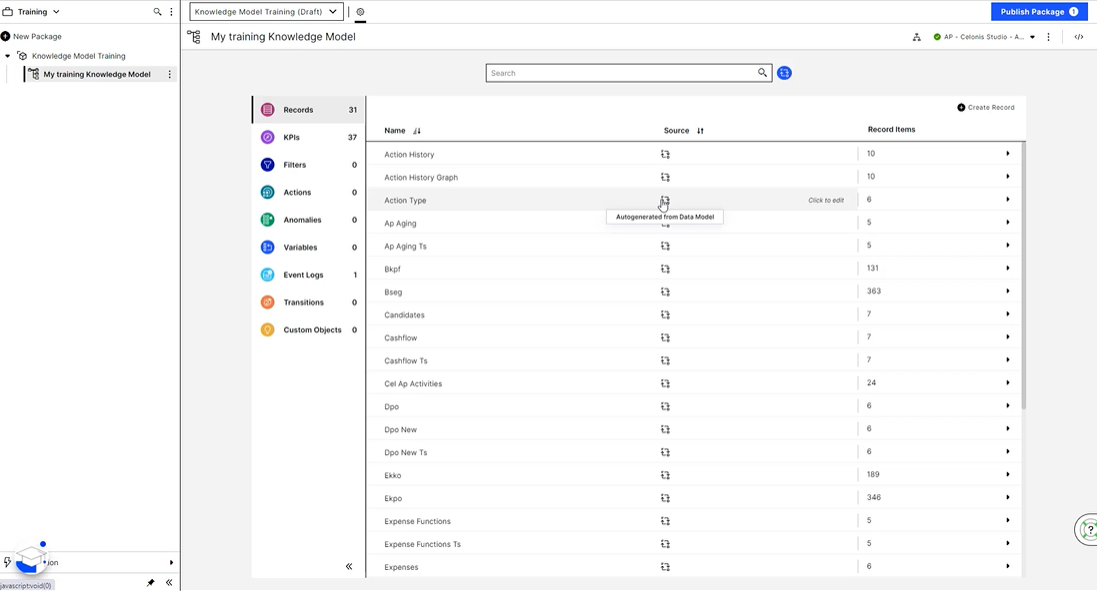
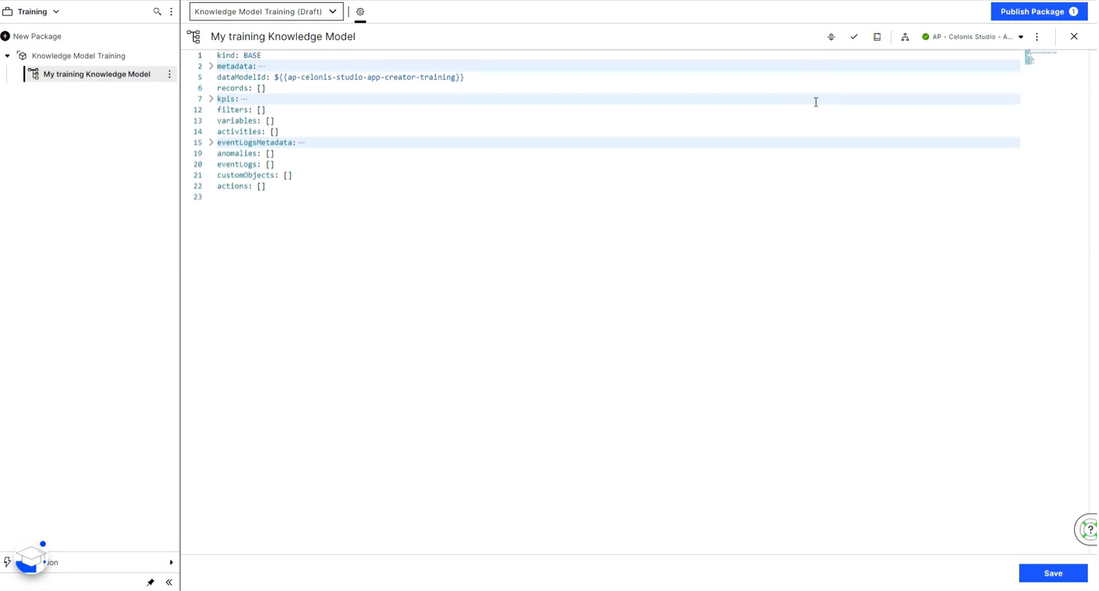
What is it that we see here? The Visual Editor of Knowledge Models, yes. But what else? Let’s see in the next lesson.
04 01 03 Review your newly created Knowledge Model [4:30]
Congrats on setting up your first Knowledge Model! Let’s review some basic navigation and give a name to what we see at the moment.


Time for an exercise!
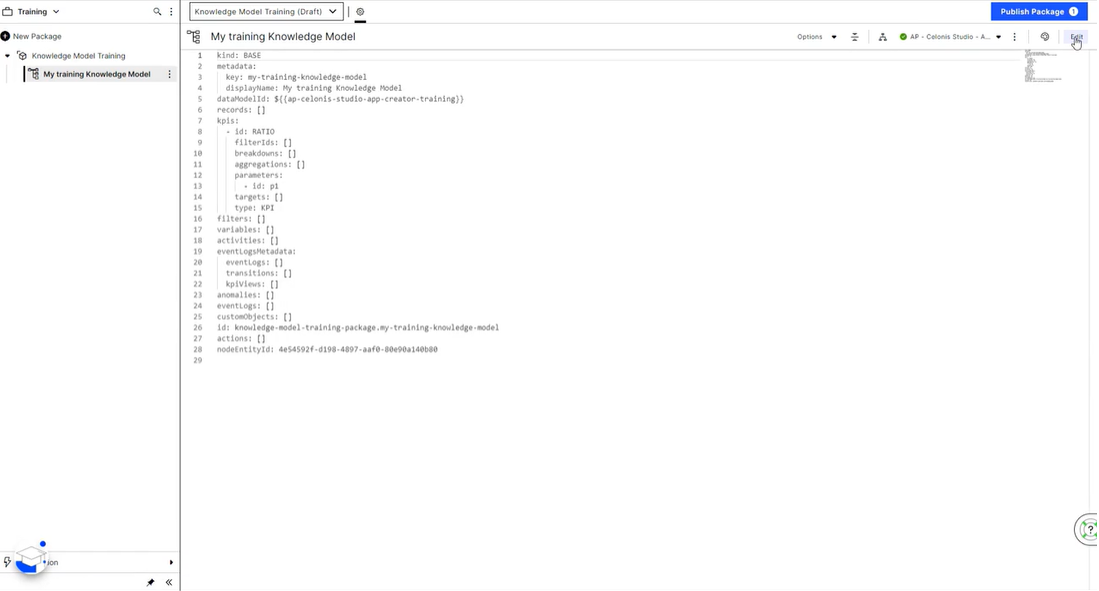
Return back to the Knowledge Model you have created before. Access the YAML Editor (Edit mode), open the documentation and fill in the blank:
The required fields of a KPI definition are id, pql and _______
Acceptable responses: displayName, Displayname, DisplayName, displayname, display name
04 02 USE THE VISUAL EDITOR TO ADD A KPI
04 02 01 What is a KPI? [2:30]
Now that we have set up a new Knowledge Model and taken the first steps in both the Visual Editor, as well as the YAML Editor, we’re ready to add our first Knowledge Object!
As you know, one category of Knowledge Objects is a KPI - a Key Performance Indicator. KPIs measure performance and indicate whether business objectives are met by an organization, a business unit, or a team. They can be either straightforward and easily calculated, or complex - requiring alignment from various stakeholders.
Example: Days Payable Outstanding (DPO)
Days Payable Outstanding is a financial ratio that indicates the average time (in days) that a company takes to pay its invoices to its creditors, which may include suppliers, vendors, or financiers. It’s a KPI that is commonly measured and monitored in Accounts Payable teams.
Let’s pretend we plan to build a View that looks similar to the one below. As you can see, one of the components it displays is a KPI List with “Days Payable Outstanding” being the first of the three KPIs listed.

Days Payable Outstanding is one of three KPIs listed in this KPI List
The corresponding YAML configuration of this View’s KPI list looks like this:

This is YAML code from the View, not the Knowledge Model!
As we know, that’s how far it gets in the View configuration. But how does the View know that the value of the KPI Days Payable Outstanding is 19 days? It knows it - or will know it - because of us and our special skill of defining the calculation scheme in the Knowledge Model!
Now that we know what we’re aiming for:
04 02 02 Review KPI Parameters [2:00]
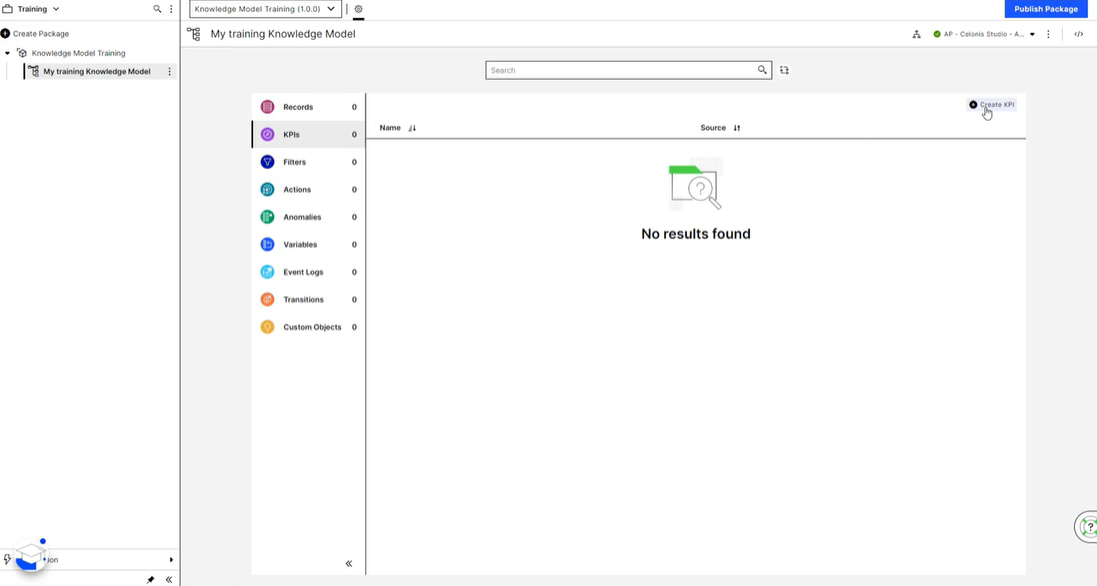
We’d like to add a KPI to our Knowledge Model. Can we… just do it? Yes, we can!
What do you think we’ll need to create a new KPI in a Knowledge Model? (Feel free to peek at the documentation!)
-
ID
-
Display Name
-
PQL formula to calculate the value
-
Reference where the KPI is used
The reference is only added in a View asset but not in the Knowledge Model.
“Id”, “displayName” and “pql” are the three mandatory parameters that we need to specify when configuring a KPI in our Knowledge Model—whether we use the YAML or the Visual Editor.
The ID and the name that should be displayed are straightforward. We remember that the name can be anything while the ID needs to be unique. So what we could define in our Knowledge Model is:
-
Display Name: Days Payable Outstanding -
Id: days_payable_outstanding
What about the PQL statement though?
In this course, we provide you with the correct PQL formula, which you’ll just need to copy and paste into the editor.
Note that in reality, it might take quite some time to figure out the correct syntax, and a really good understanding of how the Data Model is configured. We do have a course called “Basic Coding with PQL” if you need some enablement. Alternatively, we recommend you find a good friend who’s fluent in PQL ;-)
Here’s the PQL statement that we’ll add to the KPI configuration:
AVG(DAYS_BETWEEN(PU_FIRST("BSEG", "_CEL_AP_ACTIVITIES"."EVENTTIME",
      "_CEL_AP_ACTIVITIES"."ACTIVITY_EN" = 'Record Invoice Receipt')
      ,PU_FIRST("BSEG", "_CEL_AP_ACTIVITIES"."EVENTTIME",
          "_CEL_AP_ACTIVITIES"."ACTIVITY_EN" = 'Clear Invoice')))
Remember, that the purpose of the PQL parameter is to calculate the KPI’s value. We’ll not go into depth about how exactly the PQL statement above is constructed. On a high level, for each case, it calculates the days that passed by after an invoice has been recorded until the invoice has been cleared. It then takes the average of all the cases.
Other Parameters
There are some more parameters you can specify for your KPI which are not mandatory. Keep in mind that we’re looking at our Days Payable Outstanding KPIs in Days and that we’re interested in full days and not a fraction, like “2.4564 days”… And of course we assume that the lower our DPO value, the better.
04 02 03 Add “Days Payable Outstanding” to the Knowledge Model [10:30]
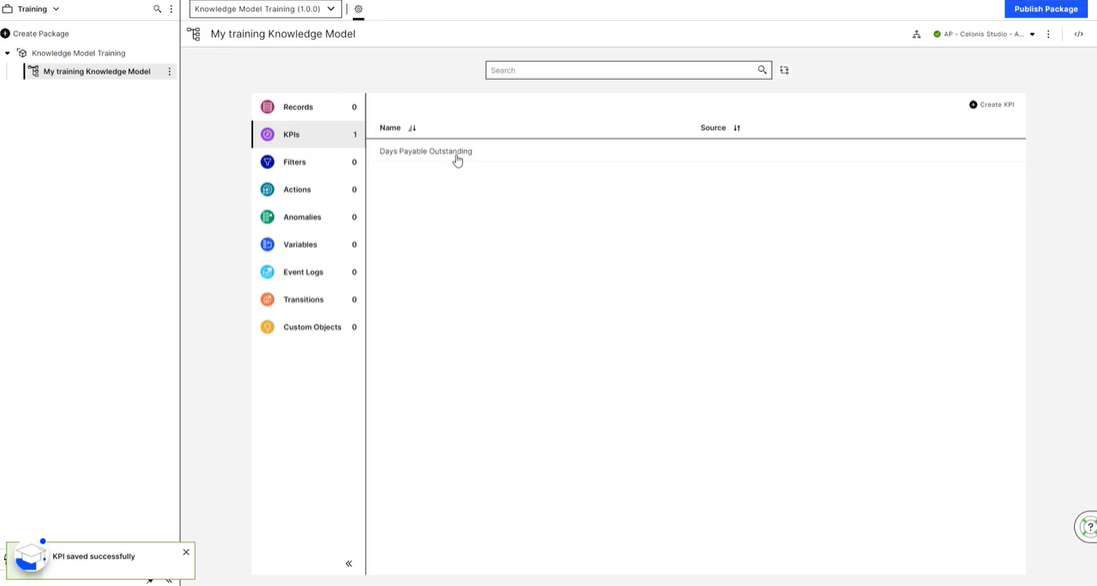
Now that we have a good understanding of our KPI, we’re finally ready to add it to our Knowledge Model! Note that the step described in the previous lesson will usually require some time and multiple stakeholders to align on a definition.
Implementing the definition into the Knowledge Model is actually the easier part. Enough talking - let’s go!
You know what time it is, right?
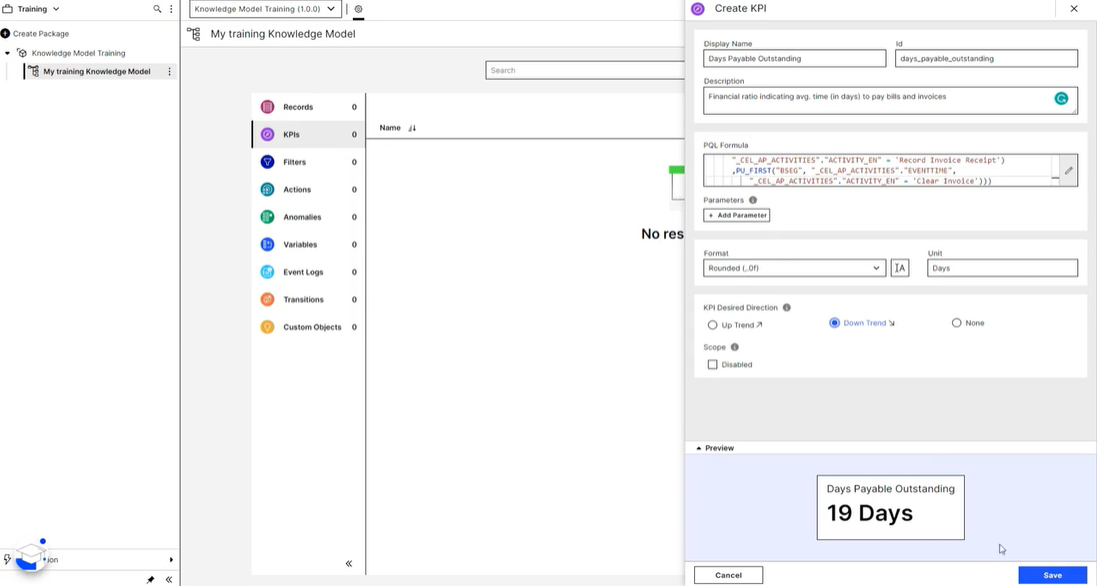
Exactly, practice time! Go to your training team and create the Days Payable Outstanding KPI in your Knowledge Model as shown in the video. Use the Visual Editor to do so. For your convenience, here are the parameters to use:
-
Display Name: Days Payable Outstanding
-
Description: Financial ratio indicating avg. time (in days) to pay bills and invoices
-
PQL: AVG(DAYS_BETWEEN(PU_FIRST(“BSEG”, “_CEL_AP_ACTIVITIES”.”EVENTTIME”, “_CEL_AP_ACTIVITIES”.”ACTIVITY_EN” = ‘Record Invoice Receipt’) ,PU_FIRST(“BSEG”, “_CEL_AP_ACTIVITIES”.”EVENTTIME”, “_CEL_AP_ACTIVITIES”.”ACTIVITY_EN” = ‘Clear Invoice’)))
-
Format: ,.0f
-
Unit: Days
-
Desired Direction: Down Trend
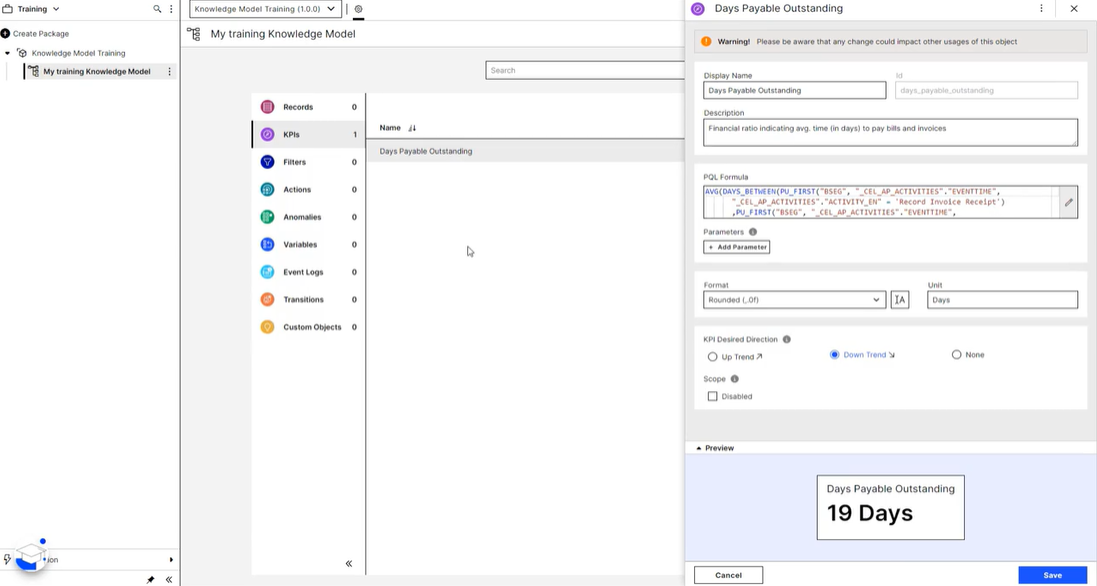
Just copying and pasting what you saw in the video is a little easy, isn’t it? So here’s your challenge: Find the KPI that you have just created using the Visual Editor in the YAML configuration!
Which parameters of your KPI do you see in the YAML that we haven’t touched upon so far?
-
Parameters
-
filterIds
-
eventLogsMetadata
-
displayName
04 03 USE THE YAML EDITOR TO ADD A RECORD
04 03 01 What is a Record? [2:30]
By now it’s probably common sense to you that a KPI we built in the previous chapter is only one type of Knowledge Object that we can define in a Knowledge Model.
Another Knowledge Object - which we’re going to add next - is a Record. But what is a Record?
A Record is the definition of a core item that Celonis tracks in its Process Mining analysis (e.g. invoice, sales order, purchase order, etc.).
It is important to understand that a Record does not store any specific information or data. It defines certain attributes that a particular instance of this Record will have. The idea is similar to object-oriented programming where you typically define classes, which is what Records can roughly be thought of.
You will often find that an Attribute is a simple PQL-statement that specifies information pulled directly from the Data Model.
Hence, in simple terms, you can consider the counterparts of Records and their Attributes as Tables and Columns of the Data Model respectively.
You can learn more about Records in the documentation!
Example: Invoice
Just as for the implementation of the Days Payable Outstanding KPI, we will again use an example from the area of Accounts Payable. What do you think is the core item that each member of an Accounts Payable team works with on a daily basis?
Yes, it’s an invoice! Our goal when creating records in Knowledge Models is to reflect business objects from the real world. What would it look like to work with an invoice in a View? Let’s have a look:

Click on the image to zoom in.
What we see above is a View displaying a number of Invoices along with information on when we need to pay the invoice, how much we need to pay, and whom to pay.
In the background (i.e. in the YAML code of the View), the configuration of the table looks like this:

Hovering elements in YAML often provides you with a description of what you see.
We see that the View references particular attributes of a Record called Invoice. As of now, we don’t have such a Record in our Knowledge Model, so let’s add it!
04 03 02 Review Record Parameters [4:00]
As you can imagine, a Record also has a few parameters that you will need to define once you configure it.
1
Let’s start easy with the parameters we are already familiar with from our KPI implementation:
-
ID
-
Display Name
-
Description
2
We also saw more characteristics of an Invoice in the previous lesson, like the Vendor or the Invoice ID. To model these characteristics within a Record, we use the Record’s attributes which you have learned about before. Let’s not make this too complex and actually stick with these two invoice attributes for our implementation. In combination, our record configuration right now looks similar to this:
- Records: ```
-
Id: INVOICE displayName: Invoice description: Information on Invoices attributes:
-
Id: Invoice_ID displayName: Invoice ID
-
Id: VENDOR displayName: Vendor ``` Thinking about what we defined for the DPO KPI, can you already identify what is still missing?
-
3
It’s a PQL statement. Or more precisely, two. How would we know where to find the Invoice ID and the Invoice value otherwise? Therefore, let’s extend the previous snippet accordingly. Take note that, you’ve been provided with a PQL query:
Records:
- Id: INVOICE
  displayName: Invoice
  description: Information on Invoices
  attributes:

  - Id: Invoice_ID
    displayName: Invoice ID
    pql: BKPF.BELNR

  - Id: VENDOR
    displayName: Vendor
    pql: LFA1.NAME1
Are we done now? Almost.
Consider the following situation:

You would agree that you work with a large number of different invoices and not just a single one.
That’s one of the key differences of comparing a Record to a KPI: While you create a single entry for each KPI in your Knowledge Model, one Record actually describes a group of many instances - like invoices. In the end, we’ll need to be able to distinguish each instance of an invoice from one another, right?
We know that this is quite abstract and might be hard to understand. We’d like to encourage you to go through this a couple of times until you’re sure you really understand the idea.
4
To distinguish one Record from another, we need a unique identifier for each instance. In practical terms, we add a column called “Identifier” to our record configuration. Let’s add it first and then describe what we’re looking at.
Records:
- Id: INVOICE
  displayName: Invoice
  description: Information on Invoices
  Identifier:
  id: INVOICE_IDENTIFIER
  displayName: Invoice Identifier
  description: The invoice identifier uniquely identifies a specific invoice
    pql: BKPF.MANDT || BKPF.BUKRS || BKPF.GJAHR || BKPF.BELNR
  attributes:

  - id: Invoice_ID
    displayName: Invoice ID
    pql: BKPF.BELNR

  - id: VENDOR
    displayName: Vendor
    pql: LFA1.NAME1
What does the Identifier we just added comprise of? Most objects in YAML requires an ID which is why even the identifier needs an ID. The parameters “displayName” and “description” ease the interpretation of what we look at later on. Last but not least, the PQL query is a unique STRING (of characters), specified by a combination of Invoice attributes in this instance.
Good news!
You will find it very easy to implement the Record configuration once you understand what it is that is required and why - and that was the goal of this lesson. Given that you have now reached the end of this lesson: Congrats! And happy implementation.
04 03 03 Add “Invoice” to the Knowledge Model [12:00]
Let’s jump right in. This time using the YAML Editor.
04 04 TIPS AND TRICKS
04 04 01 Make use of the PQL Editor [2:30]
04 04 02 CTRL + Space [1:00]
04 04 03 Deep Dive into your Data Model [0:40]
04 04 04 Congrats! [0:20]
05. Build a View : REQUIRED
-
Build a View
-
Learn how to create a View and add various components to it.
06. Case Study : REQUIRED
- Build a Knowledge Model and a View yourself in this case study!
results matching ""
No results matching ""
카탈로그
- 01 Build Knowledge Models and Views
- 01. Navigate the Celonis Studio : REQUIRED
- 02. YAML Basics : ELECTIVE
- 02 02 The general structure of YAML [05:00]
- 02 03 Test your YAML knowledge [10:00]
- 03.The Interdependence of Knowledge Models and Views : REQUIRED
- 04. Build a Knowledge Model : REQUIRED
- 04 04 TIPS AND TRICKS